OpenID Connect application registration
A FoxIDs OpenID Connect application registration lets a web, single-page or native application authenticate users through FoxIDs and receive ID tokens and access tokens. The application is the Relying Party (RP), and FoxIDs is the OpenID Provider (OP).

Key OpenID Connect capabilities include discovery, Authorization Code Flow, PKCE, client secrets and keys, the UserInfo endpoint, RP-initiated logout and front-channel logout.
Configuration
In FoxIDs Control:
- Select the environment in which the application should be registered.
- Open Applications and click Add application.
- Choose Web Application, Single Page Application or Native Application. These three OpenID Connect options are shown without enabling Show all options.
- Enter a name and redirect URI, review the generated application information, and click Create.
- Copy any generated secret before closing the creation result. A generated secret is only shown during creation.
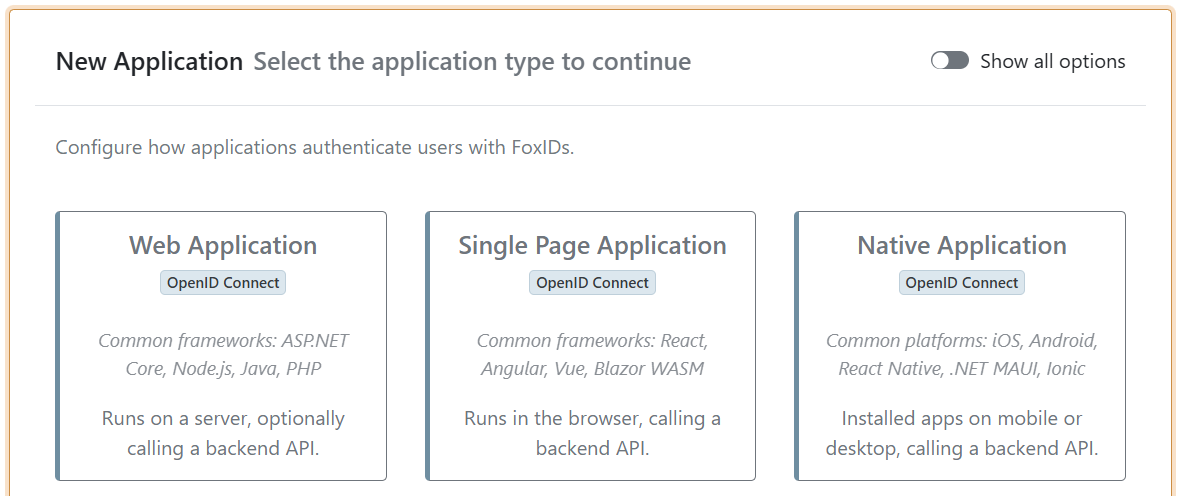
After creation, click Change application to review or change the complete application settings. The application type card provides a suitable starting configuration; the resulting OpenID Connect client can subsequently be adjusted.
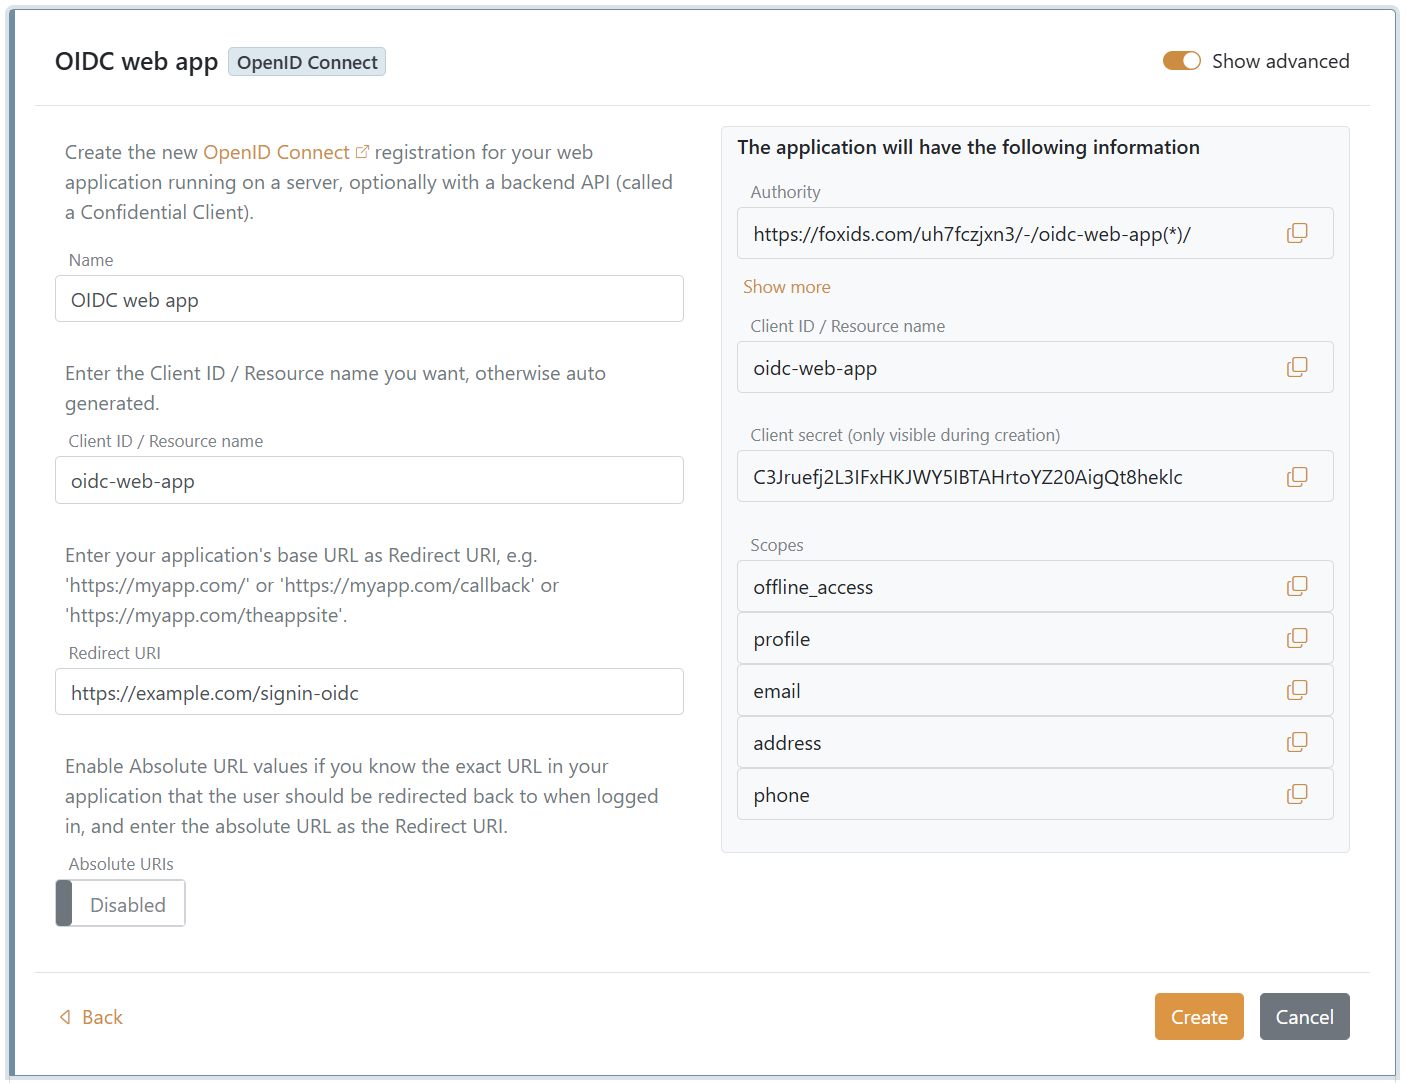
Web application (confidential client)
Choose Web Application for an application running on a server, such as an ASP.NET Core, Node.js, Java or PHP application. It is created as a confidential client with:
- Authorization Code Flow using the
coderesponse type. - A generated client secret.
- PKCE disabled by default. Enable Require PKCE after creation when the application supports PKCE; this is recommended as additional protection for the authorization code.
Enter the application's base URL or callback URL as the Redirect URI. Enable Show advanced during creation only if you need to choose the client ID or configure exact redirect URL matching.
Single page application (public client)
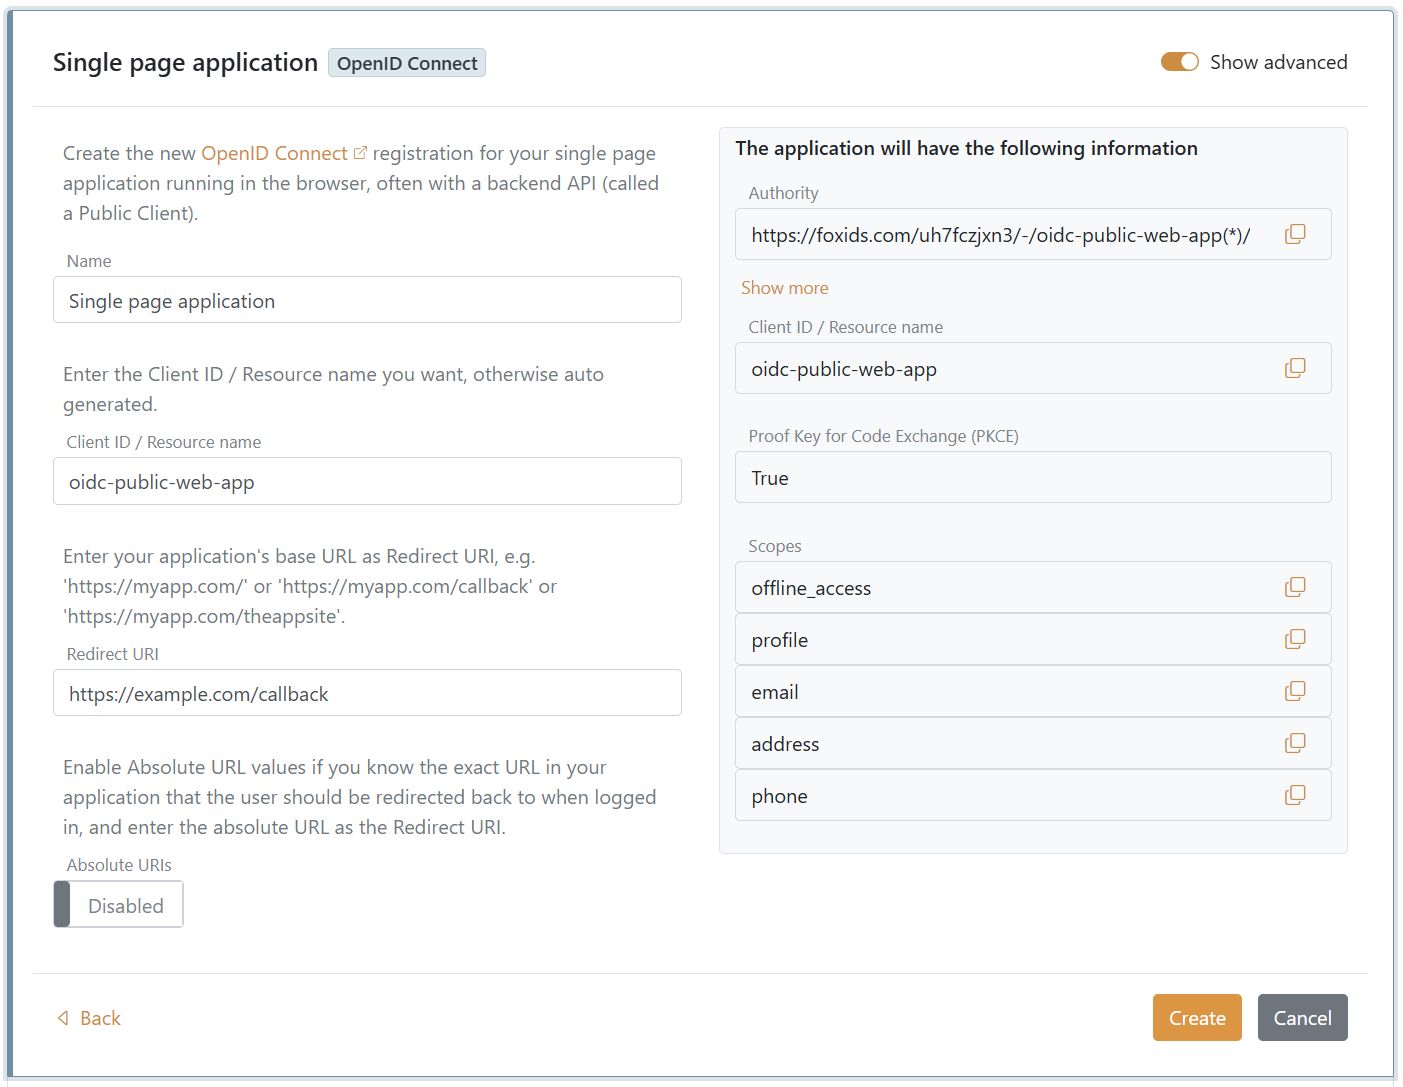
Choose Single Page Application for an application running in the browser, such as React, Angular, Vue or Blazor WebAssembly. It is created as a public client with:
- Authorization Code Flow using the
coderesponse type. - PKCE enabled by default.
- No client secret.
- The redirect URL origin added as an allowed CORS origin.
Native application (public client)
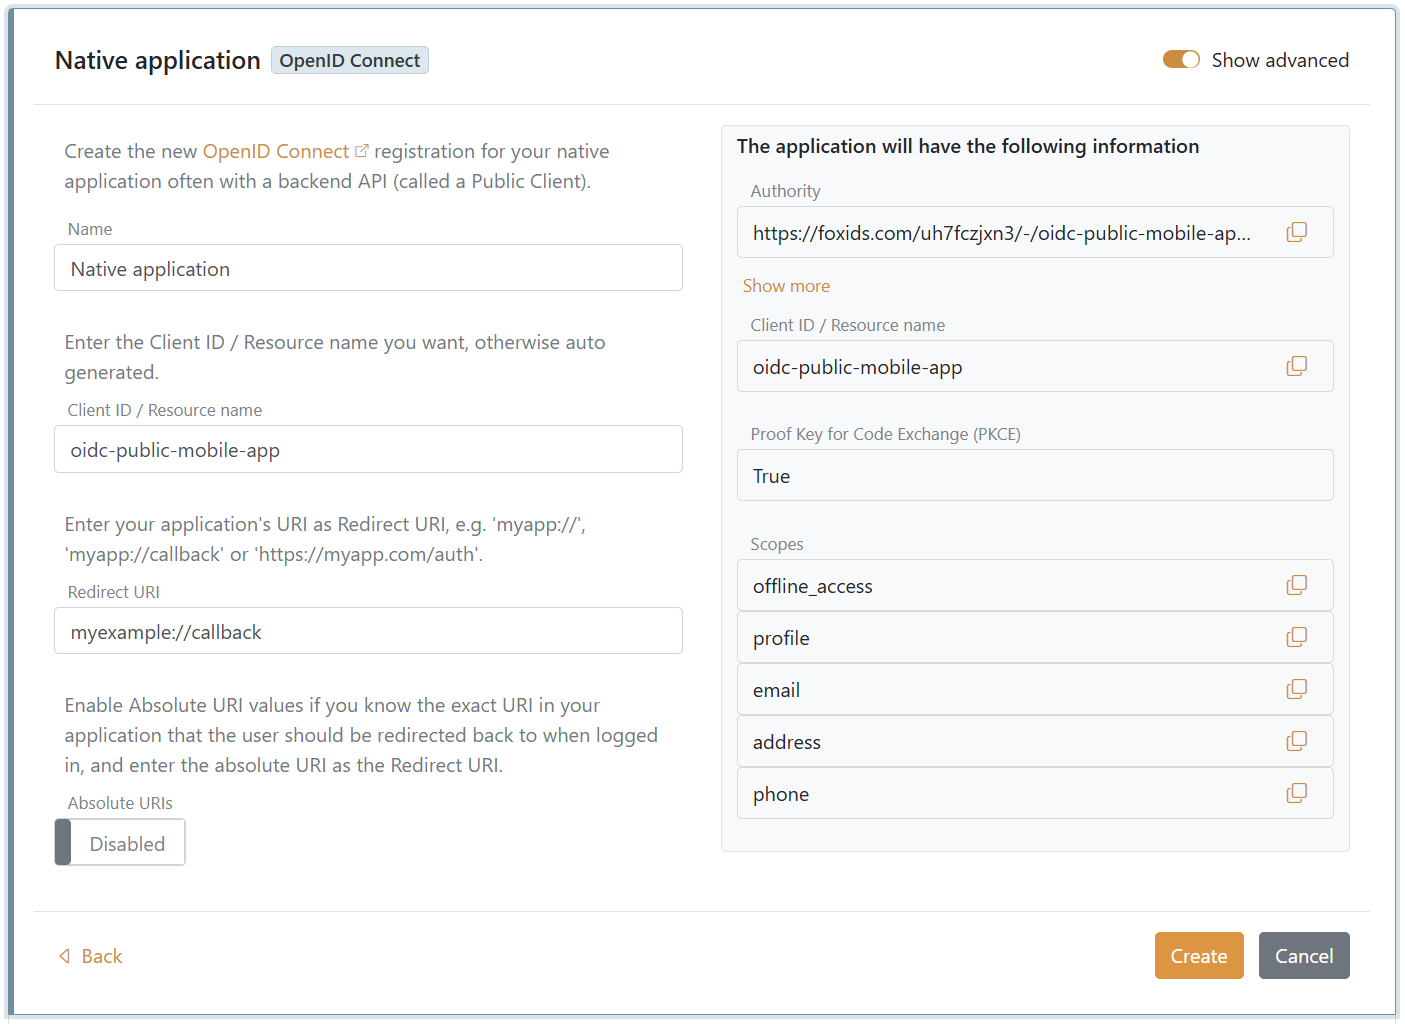
Choose Native Application for an installed mobile or desktop application, such as iOS, Android, React Native, .NET MAUI or Ionic. It is created as a public client with Authorization Code Flow, PKCE enabled by default and no client secret.
The redirect URI can use an application-specific scheme such as myapp://callback or an HTTPS URI supported by the application.
Redirect URIs and absolute values
By default, Absolute URIs is disabled for web and single-page applications. The configured redirect URL is then treated as a base value, and redirect URLs starting with that value are accepted.
Enable Show advanced and Absolute URIs if you know the exact URL in your application to which the user should be redirected after login. Enter that exact URL as the Redirect URI. The same setting supports exact application-specific URIs for native applications.
After creation, redirect URIs, post-logout redirect URI and allowed CORS origins can be changed on the OpenID Connect Client tab. When allowed CORS origins have not been edited separately, FoxIDs keeps origins that match redirect URIs synchronised with redirect URI changes. Explicitly editing the allowed CORS origins preserves the values you enter. Keep Show advanced disabled unless the setting you need is advanced.
Implicit flow
Implicit Flow is retained for compatibility but is not recommended for new applications. Prefer Authorization Code Flow with PKCE.
To configure an existing public client for Implicit Flow, click Change application, enable Show advanced, change Response types to token id_token or optionally only token, and disable Require PKCE. Response types can be changed in the same advanced client settings when another supported combination is required.

Application endpoints and client security
The application information in FoxIDs Control provides the authority, client ID, discovery endpoint, authorize endpoint and token endpoint. An OpenID Connect discovery document has this form:
https://foxids.com/tenant-x/environment-y/application-client1(*)/.well-known/openid-configuration
An application can allow sign-in through multiple authentication methods. If an authentication method defines profiles, the base authentication method and each authentication method profile can be selected independently. To select an authentication method in the authority URL, add its name to the application segment:
https://foxids.com/tenant-x/environment-y/application-client1(login)/.well-known/openid-configuration
During RP-initiated logout, the authentication method name can be omitted when the ID token is included in the request.
Application-specific issuer
By default, tokens issued to the application use the environment issuer:
https://foxids.com/tenant-x/environment-y/
To make the issuer match the application's authority, click Change application, enable Show advanced, and enable Use matching issuer and authority with application specific issuer. The issuer then becomes:
https://foxids.com/tenant-x/environment-y/application-client1(*)

The application-specific issuer changes when the selected authentication methods in the authority URL change. For APIs, the issuer therefore depends on the calling application. Token exchange is possible only between configurations with corresponding authentication methods.
Client security
Public clients, including single-page and native applications, cannot securely hold client credentials. Configure them without a client secret and use Authorization Code Flow with PKCE.
Confidential clients authenticate at the token endpoint. The default client authentication method is client secret post; enable Show advanced to change it to client secret basic or private key JWT. PKCE is also recommended when the confidential client supports it. If both PKCE and a client secret or key are configured, FoxIDs validates both.
Client authentication method none is supported with PKCE. Up to 10 secrets and 4 keys can be configured for a client. Store client secrets and private keys securely and rotate them when required.
FoxIDs establishes a session when the user authenticates and includes its session ID in the ID token. The session is invalidated on logout. Depending on the client configuration and whether the logout request contains an ID token, FoxIDs can show a logout confirmation dialog.
Client and API
An OpenID Connect application registration can contain both the client and its OAuth 2.0 resource. The client ID is then also the API resource name.
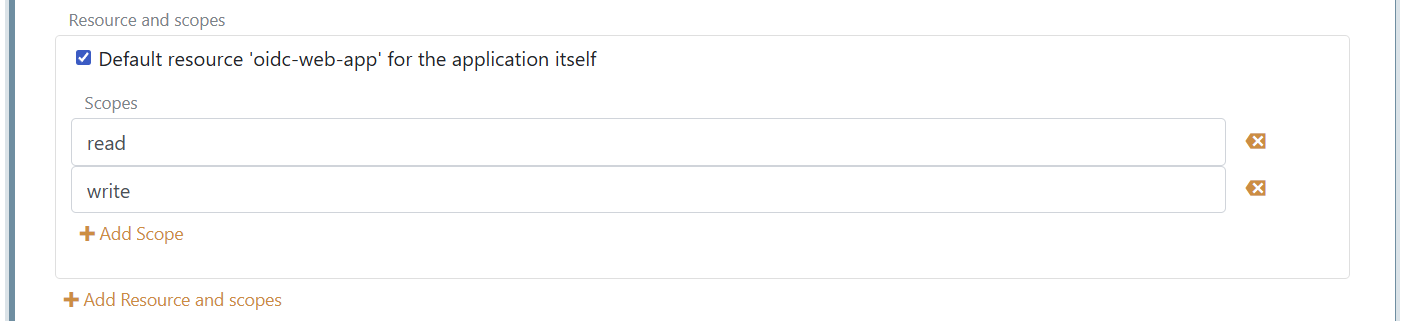
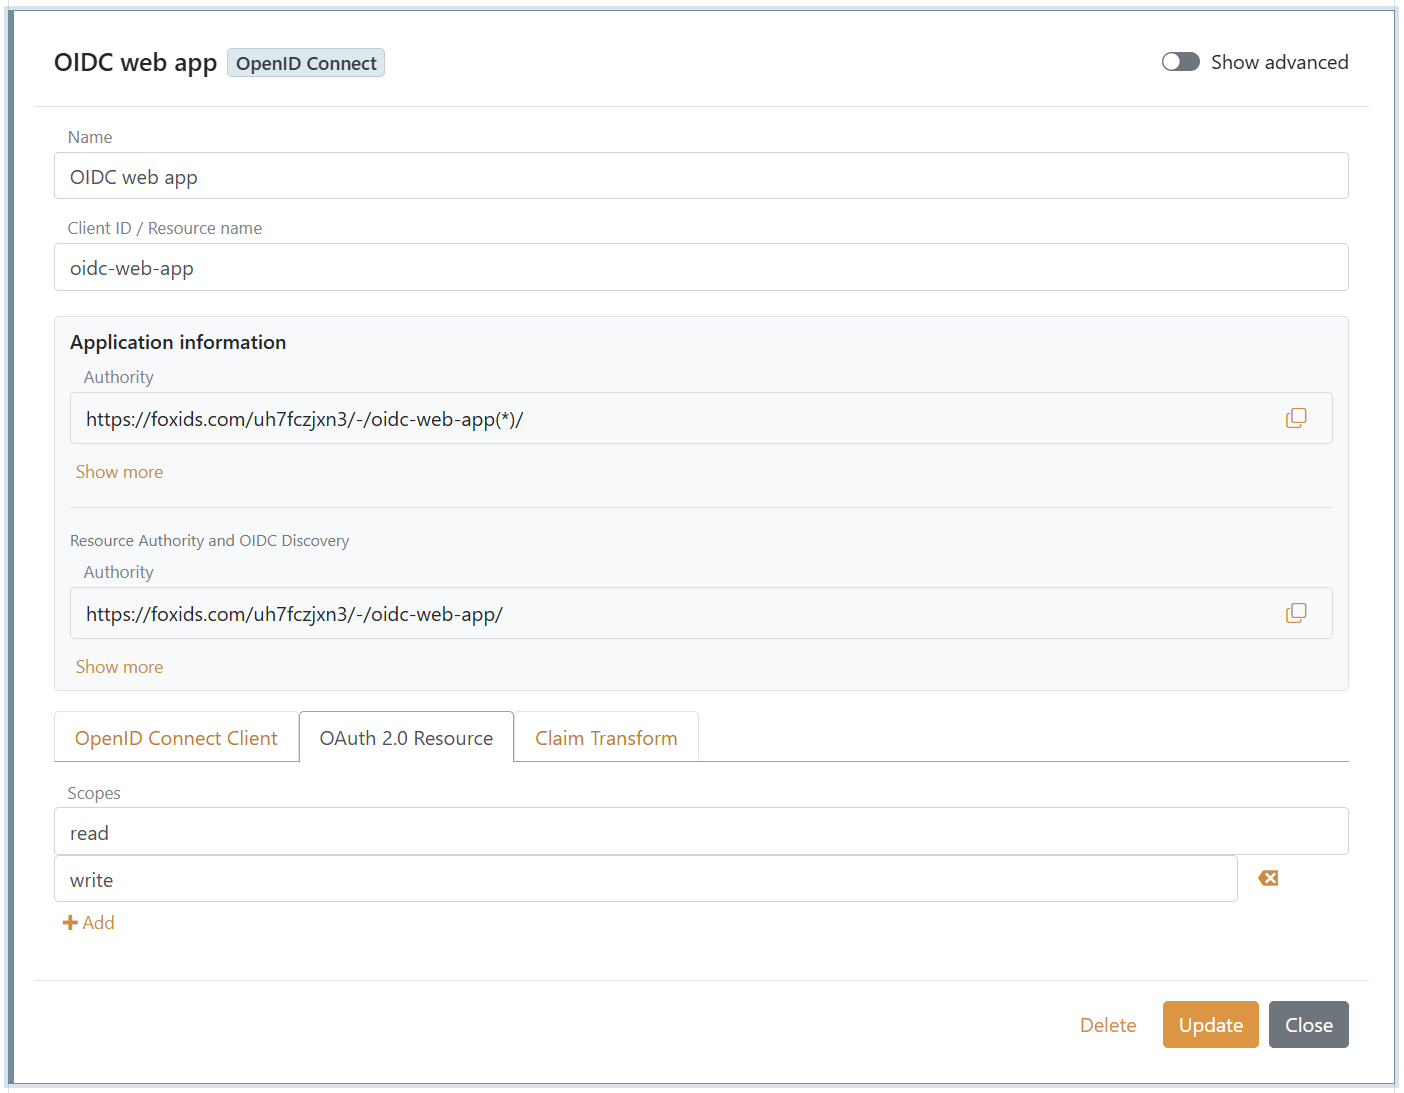
The following example configures oidc-web-app as both an OpenID Connect client and an API:
- Click Change application and enable Show advanced.
- Change the application registration type to OpenID Connect Client and OAuth 2.0 Resource.
- On the OpenID Connect Client tab, keep Default resource 'oidc-web-app' for the application itself selected.
- Add the
readandwritescopes beneath the default resource.
On the OAuth 2.0 Resource tab, define the same read and write scopes exposed by the API.
Resource and scopes
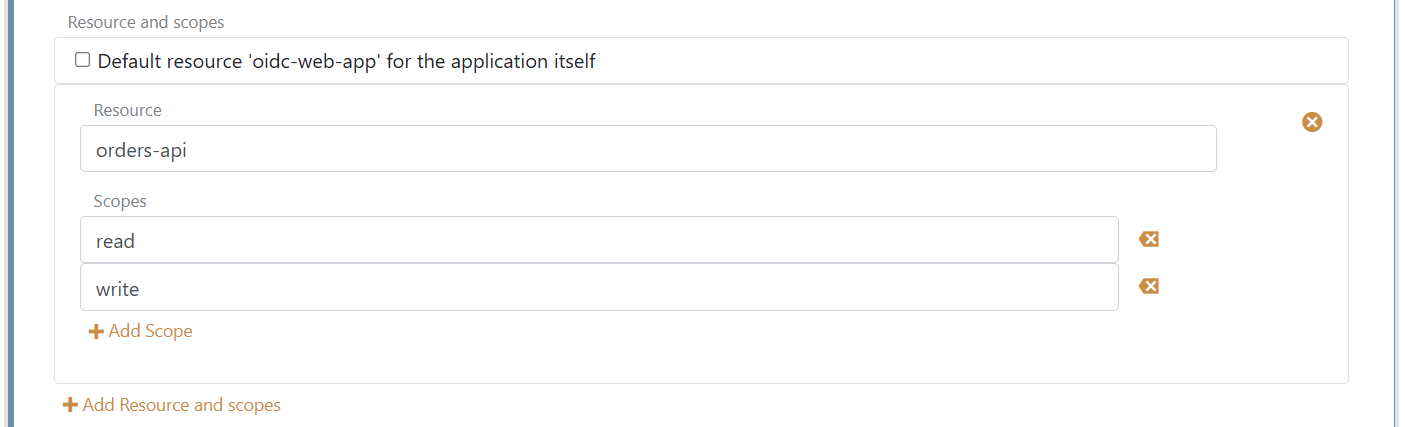
An API can instead be registered separately as an OAuth 2.0 resource. In this example, the client oidc-web-app calls a separate Orders API with the resource name orders-api.
On the client's OpenID Connect Client tab:
- Clear Default resource 'oidc-web-app' for the application itself, because this client is not acting as its own API.
- Add the resource
orders-api. - Add the
readandwritescopes beneath that resource.
The complete scope values requested by the client are orders-api:read and orders-api:write.
In the Orders API application registration, define read and write on the OAuth 2.0 Resource tab.
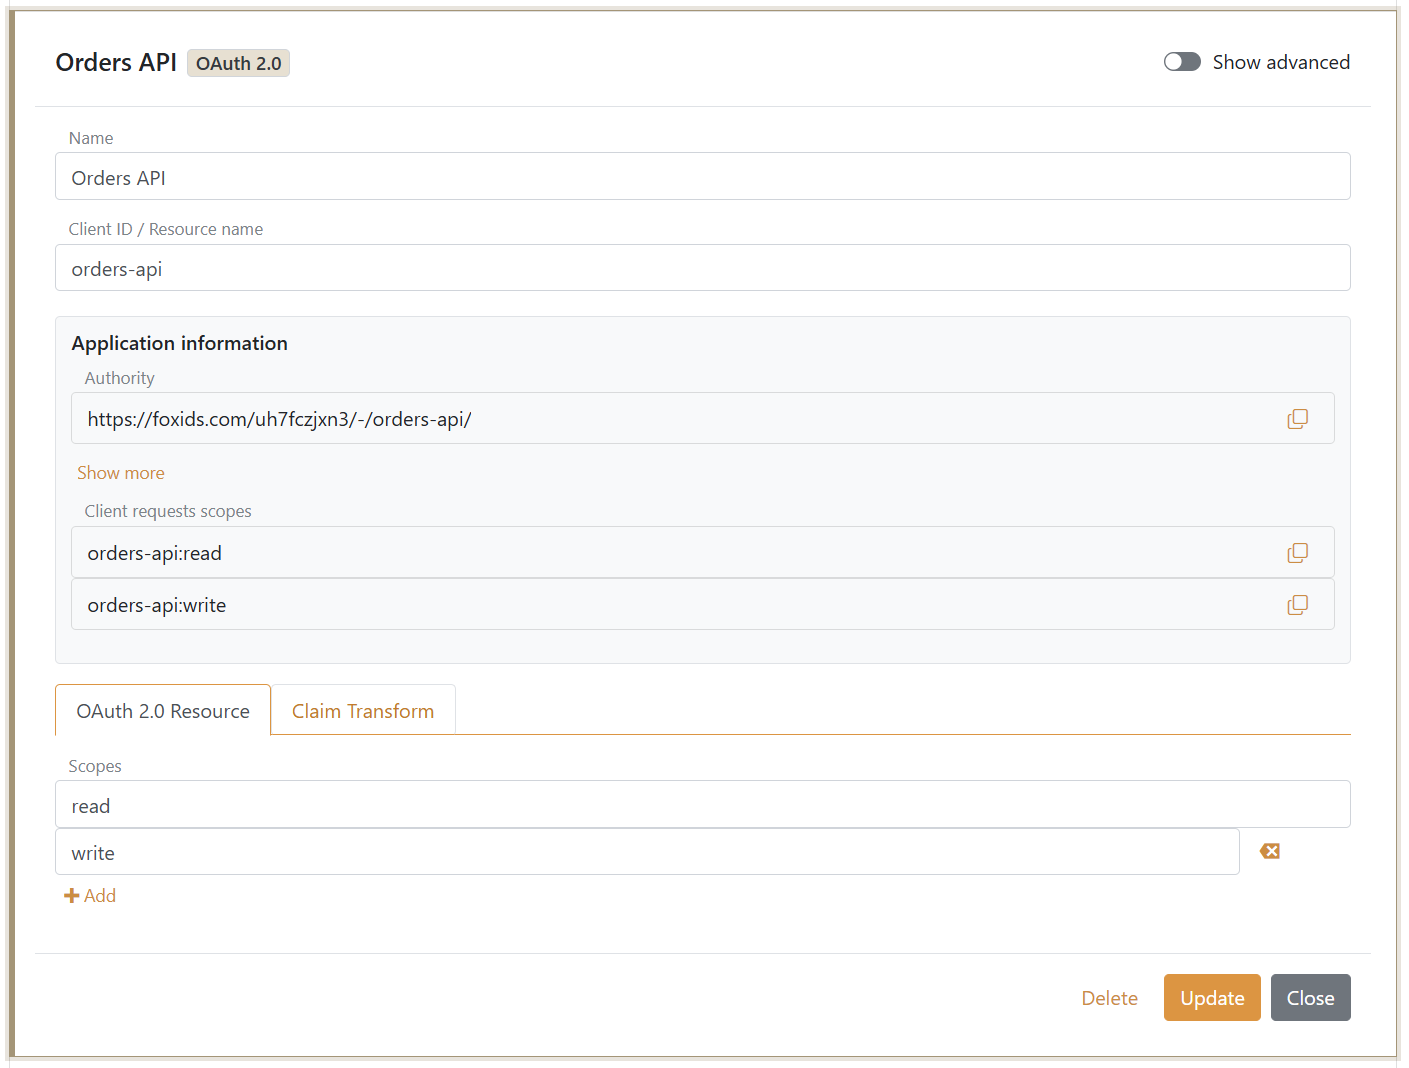
Scopes requested by a client are validated against the scopes configured on the API. If the client and API are in the same application registration, scopes added beneath the default resource on the client are automatically added to the resource.
By default, the client ID is the audience of both the ID token and access token. Configured resource scopes add API audiences to the access token, and one access token can target multiple API resources.
Scopes and claims
OpenID Connect scopes are configured on the OpenID Connect Client tab. The default offline_access, profile, email, address and phone scopes can be changed or removed. For each scope, Voluntary claims controls which claims are issued when the client requests that scope.
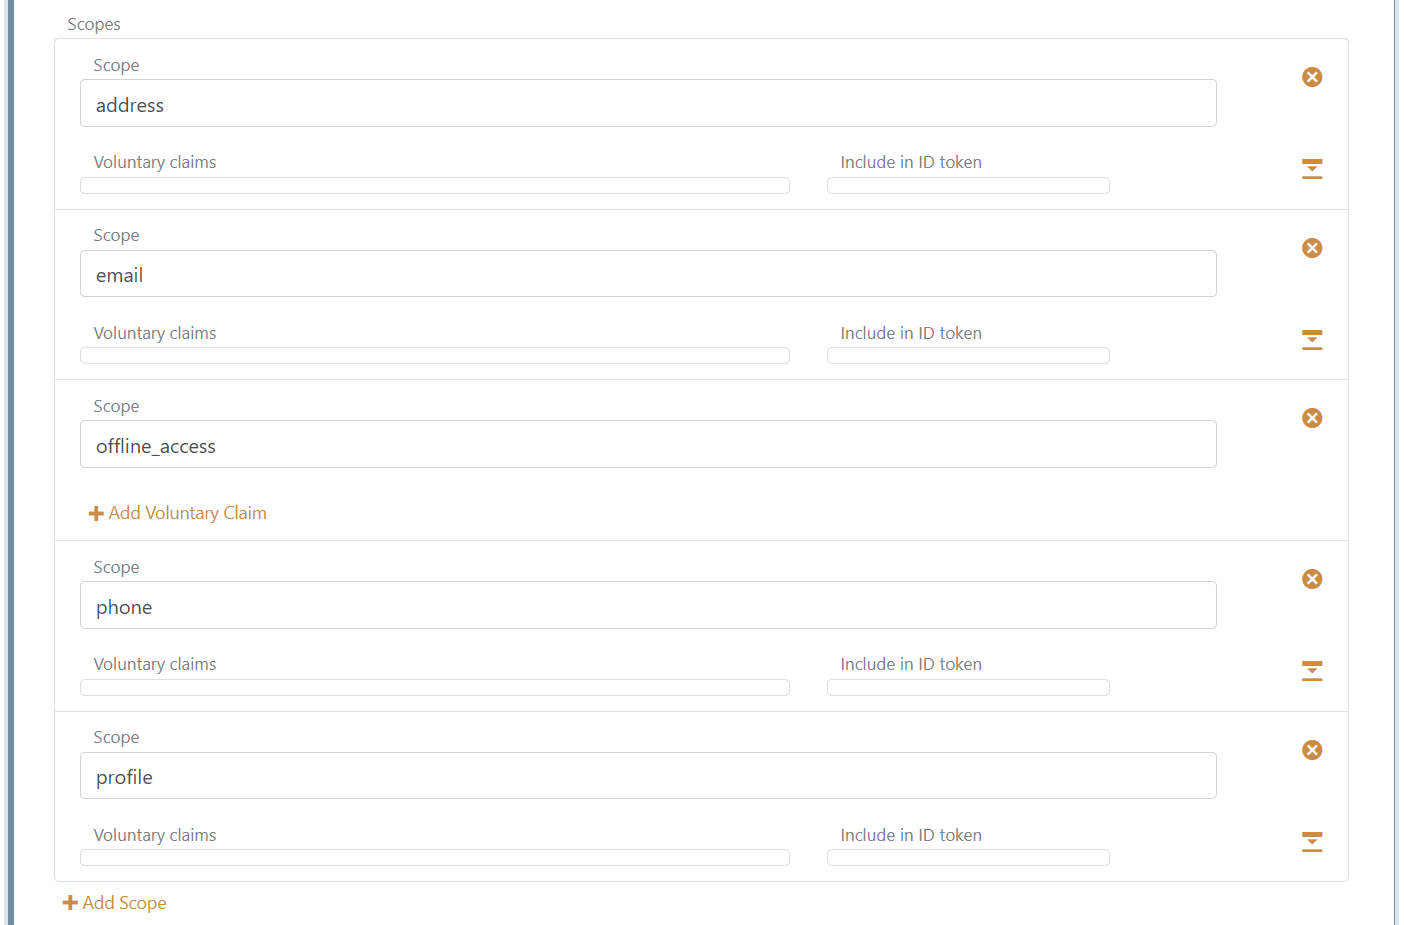
Enable Show advanced to configure Issue claims. Add a specific claim, or add * to issue all available claims in the access token. Keep Include in ID token disabled for *; otherwise every available claim is copied into the ID token, which can make it excessively large and cause problems in flows where the ID token is sent during logout.

Alternatively, add a claim to a scope's Voluntary claims and request that scope from the application. Individual claims can be included in the ID token when the application needs them there. Claims can also be changed with claim transforms and claim tasks.
Token lifetime
Click Change application and enable Show advanced to configure the authorization code, ID token, access token and refresh token lifetimes.
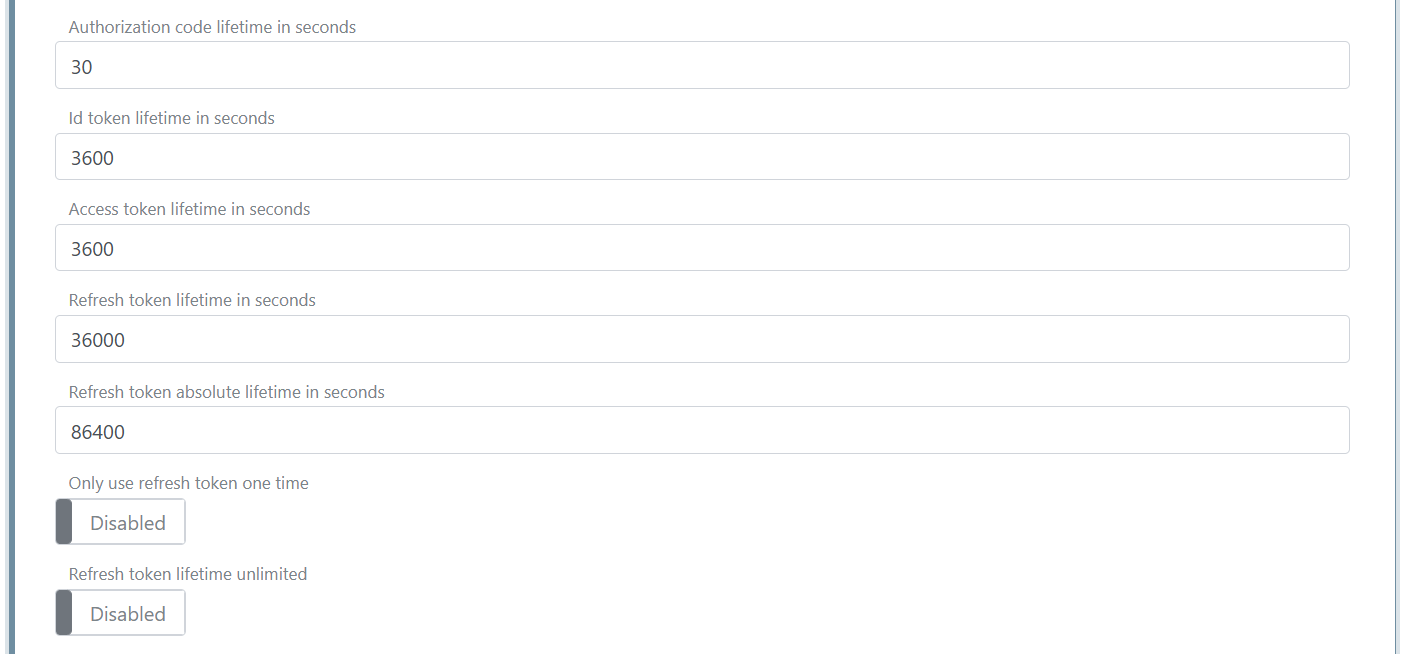
In this example, each refresh token is valid for 36,000 seconds. The application can continue refreshing the session until the refresh token absolute lifetime of 86,400 seconds is reached.
Require multi-factor authentication (MFA)
An OpenID Connect client can require MFA by including urn:foxids:mfa in the acr_values parameter. It can be combined with more specific values such as urn:foxids:link. See request MFA from applications.
The acr_values parameter can be set in the OnRedirectToIdentityProvider event in Startup.cs:
options.Events.OnRedirectToIdentityProvider = (context) =>
{
    context.ProtocolMessage.AcrValues = "urn:foxids:mfa";
    return Task.FromResult(string.Empty);
};
See the AspNetCoreOidcAuthorizationCodeSample and its Startup.cs configuration.
Request parameters
Configure Allowed request parameters to expose selected authorisation query values as _local:params:{name} in authentication-method and application claim transforms. Parameters can contain a single value or a space-separated list. See application request parameters for configuration, limits and session continuity.
How-to guides
- Connect Tailscale