Microsoft Entra ID mit WS-Federation verbinden
Verwenden Sie FoxIDs als WS-Federation Security Token Service (STS) für eine föderierte Microsoft Entra ID-Domäne und föderierte Windows-Anmeldung.
FoxIDs können als Verbundidentitätsanbieter für mit Microsoft Entra verbundene und mit Microsoft Entra Hybrid verbundene Windows-Geräte verwendet werden.
In einer Verbundumgebung erfordert Microsoft Entra ID WS-Federation- und WS-Trust-Unterstützung für die Windows-Anmeldung. FoxIDs stellt die WS-Federation-Metadaten, den MEX-Endpunkt und den aktiven WS-Trust UsernameMixed-Endpunkt bereit, die für diese Microsoft Entra ID- und Windows-Flows erforderlich sind. FoxIDs verbindet oder registriert keine Geräte; Die Geräteregistrierung erfolgt über Microsoft Entra ID und Windows.
Organisationen, die AD FS für den Microsoft Entra ID-Domänenverbund verwenden, können FoxIDs für die in diesem Handbuch beschriebene Rolle des Verbundidentitätsanbieters verwenden.
Konfigurieren Sie FoxIDs
In dieser Anleitung wird beschrieben, wie Sie FoxIDs als STS für eine föderierte Microsoft Entra ID-Domäne konfigurieren. Benutzer werden mit ihrer Immutable ID mit Microsoft Entra ID-Benutzern verbunden.
1 - Create the Microsoft Entra ID WS-Federation application in FoxIDs Control Client
The recommended setup is to use the Connect to Microsoft Entra ID application template. The template enables Microsoft Entra ID Windows sign-in, configures the WS-Federation metadata URL, adds the required issue claim and claim transforms, and uses an application-specific issuer.
- Select the Applications tab.
- Click Add application.
- Select Connect to Microsoft Entra ID with the WS-Federation badge.
- Add the display name, e.g.
Microsoft Entra ID. - Select Automatic federation (recommended).
- Add the verified Microsoft Entra domain to synchronise.
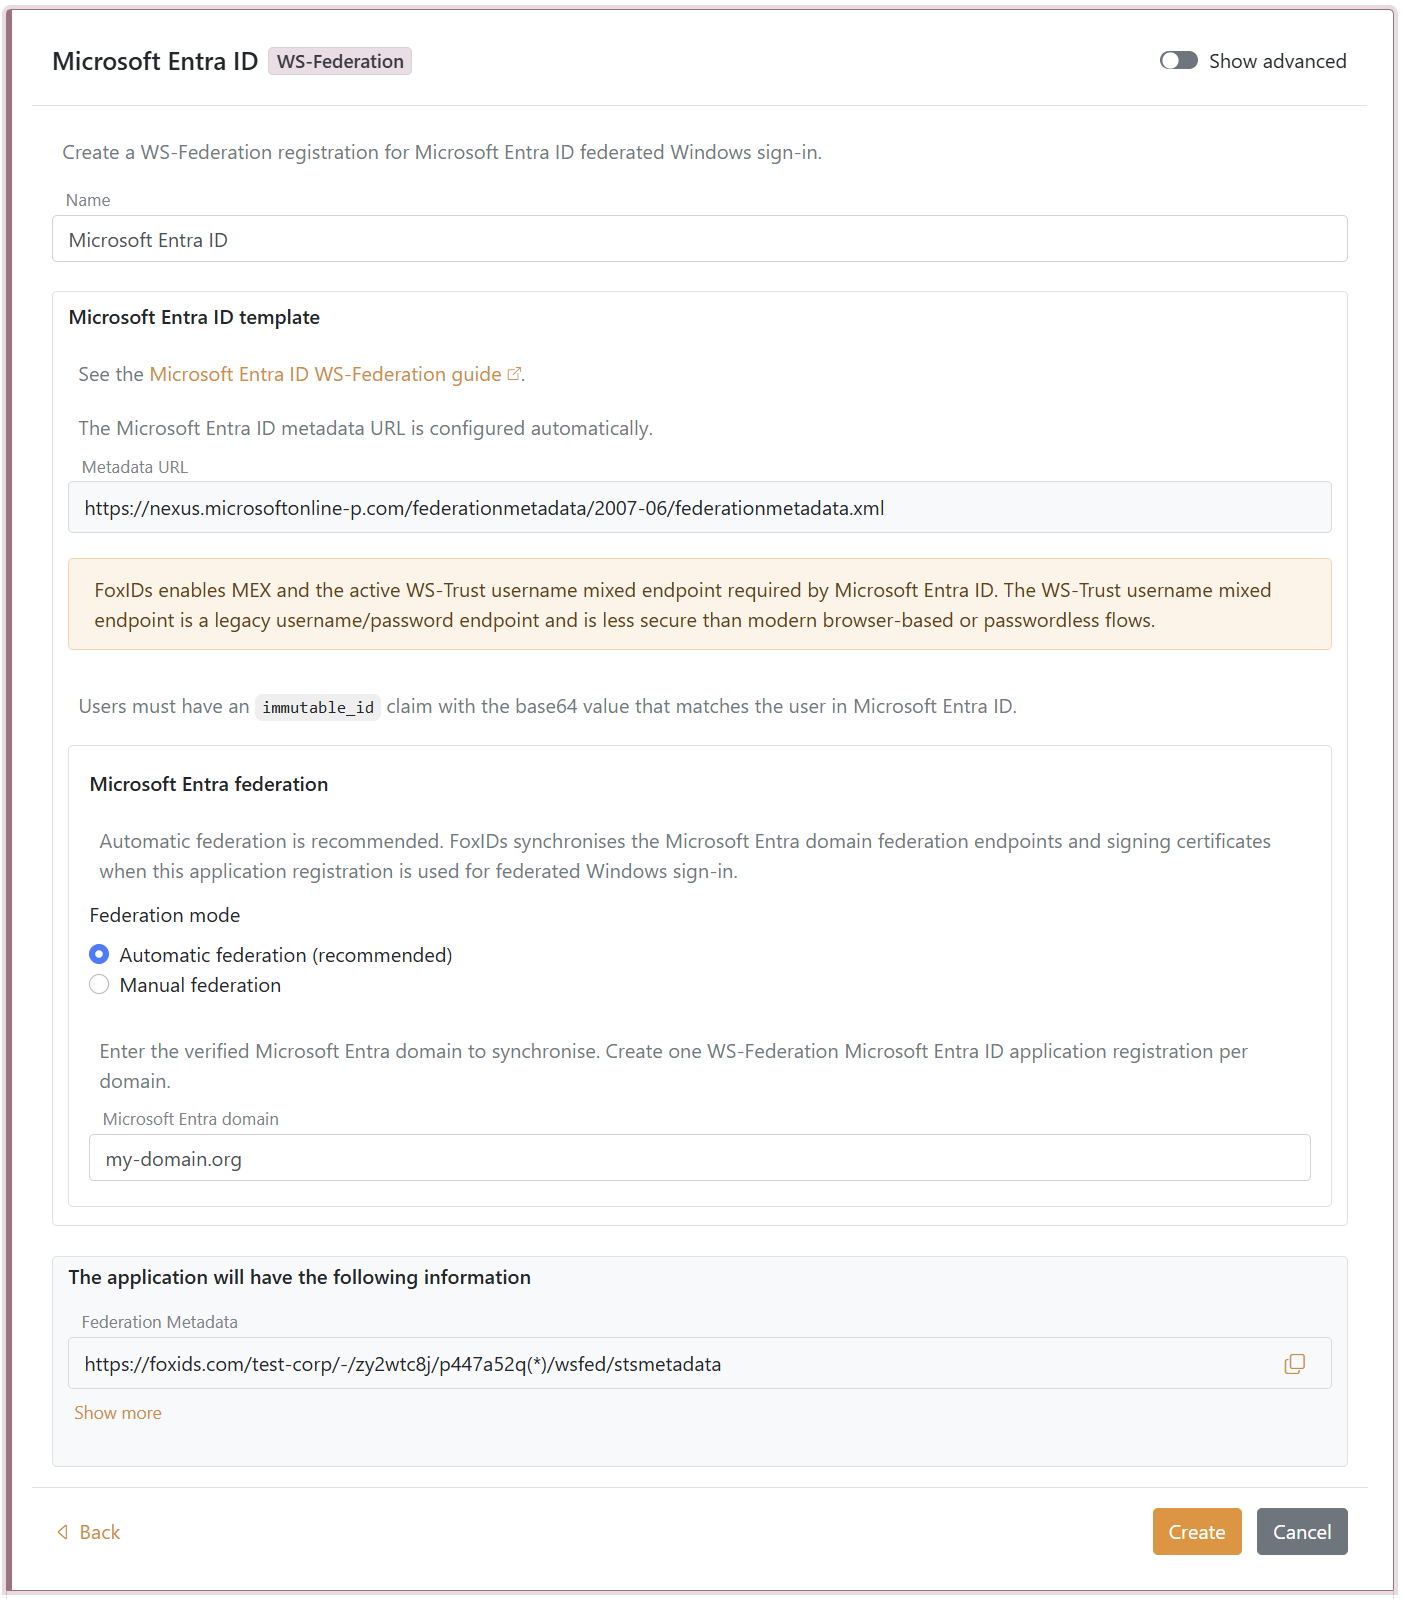
- Click Create.
- Click Set up Microsoft Entra federation.
If automatic federation is not available in a self-hosted deployment, configure the automatic Microsoft Entra ID sync app registration first or select Manual federation and configure Microsoft Entra ID manually.
2 - Grant consent and synchronise Microsoft Entra federation
Automatic federation uses Microsoft Graph to create or update the Microsoft Entra ID domain internalDomainFederation configuration. FoxIDs synchronises the WS-Federation endpoints, the MEX endpoint, the active WS-Trust endpoint, the primary signing certificate and the secondary signing certificate if one exists.
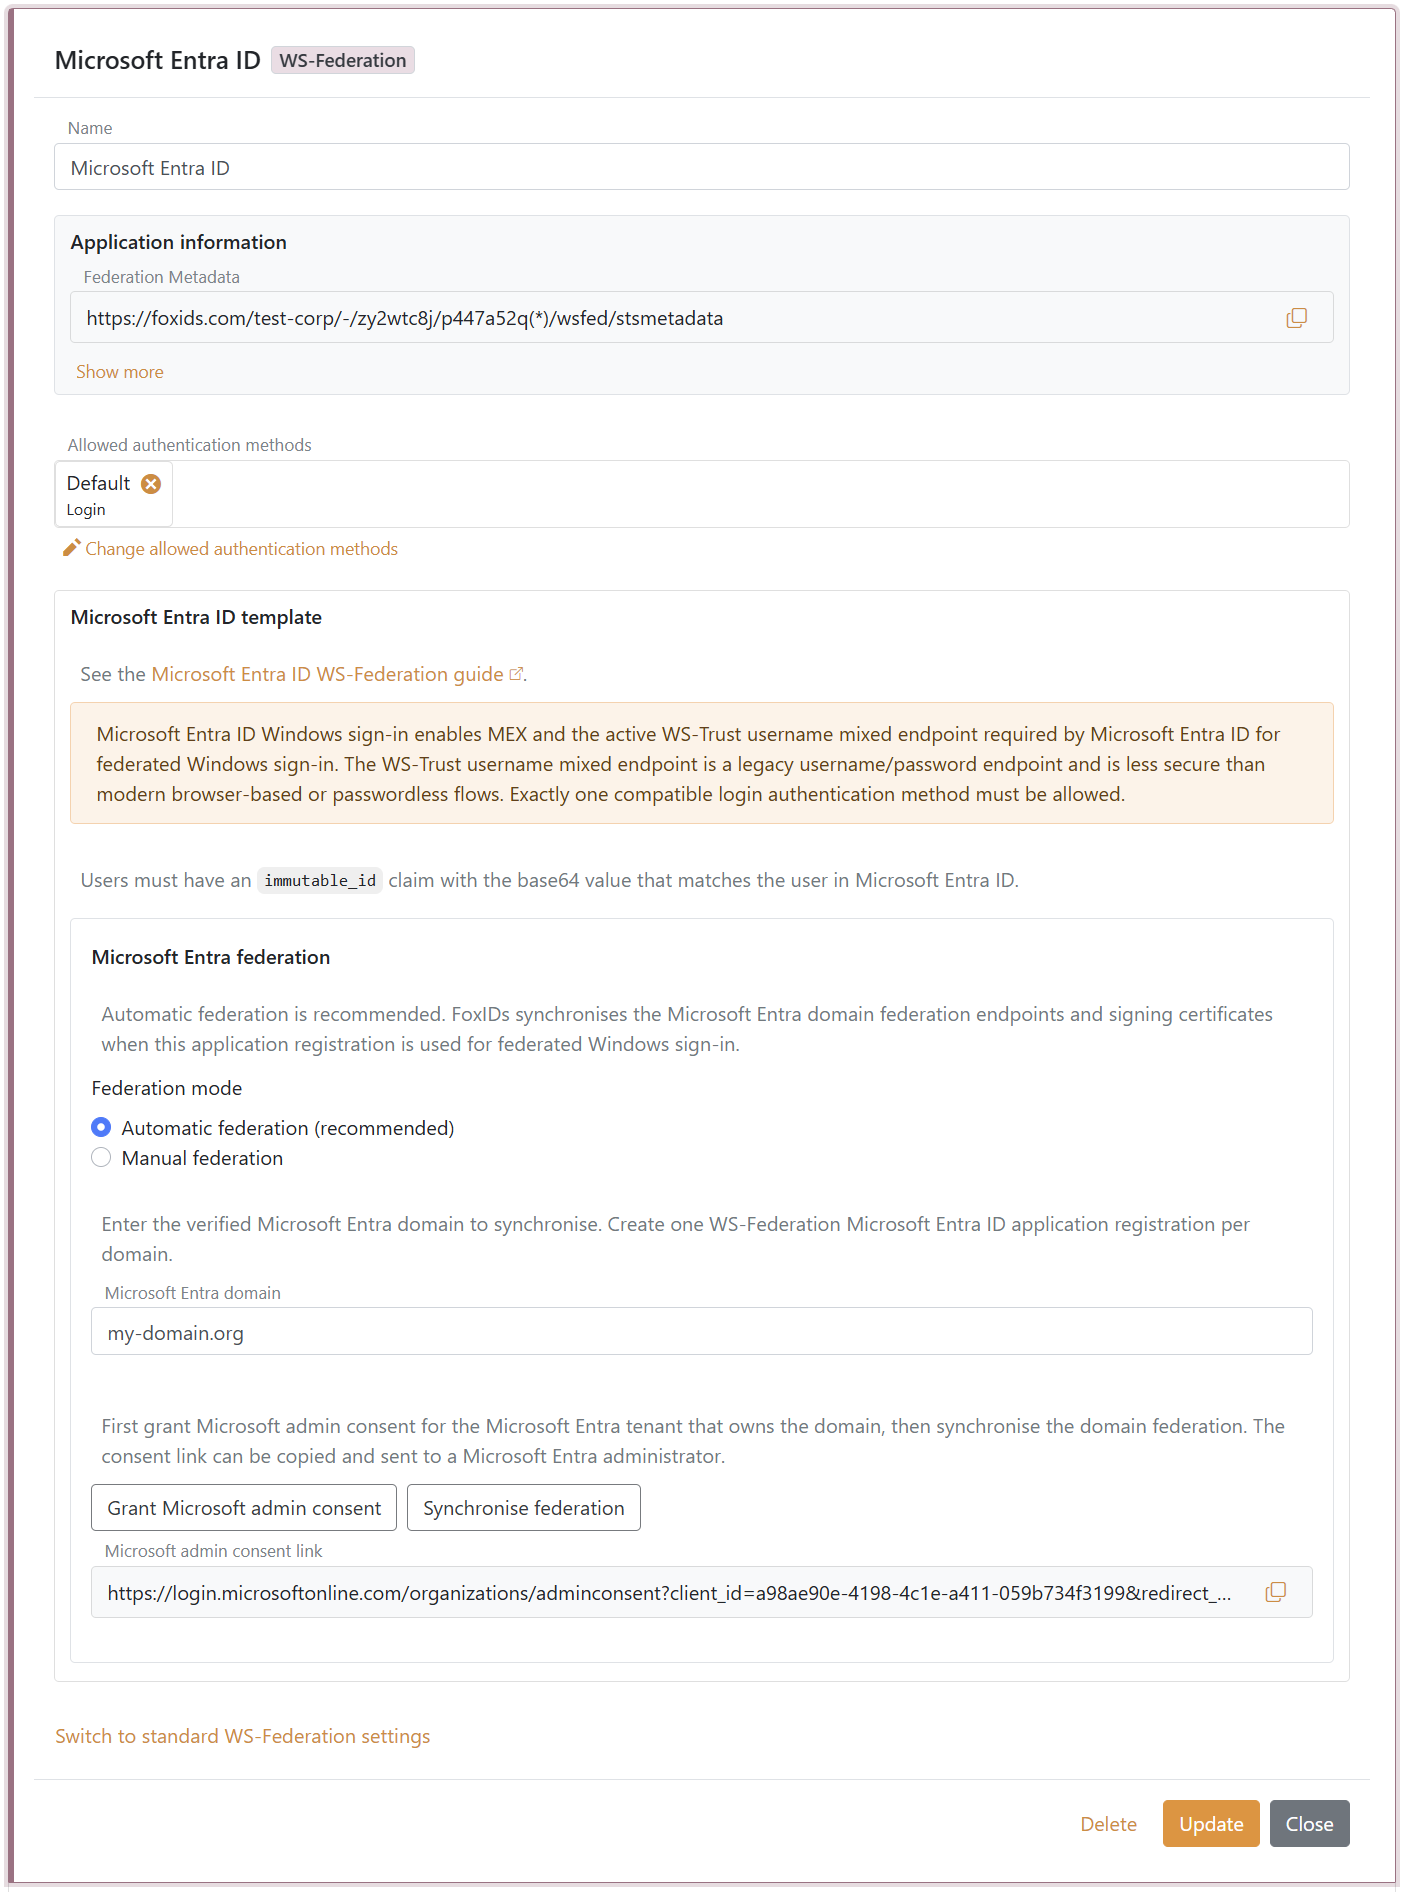
- In the Microsoft Entra ID template, click Grant Microsoft admin consent.
- Sign in as a Microsoft Entra administrator for the tenant that owns the domain and accept the consent.
- Return to FoxIDs Control.
- Click Synchronise federation.
- Verify that the synchronisation status is successful.
After the first successful synchronisation, Microsoft Entra ID trusts the FoxIDs WS-Federation application registration for the configured domain. FoxIDs also checks the federation during federated Windows sign-in and synchronises again if the signing certificate has changed or the previous synchronisation was not successful.
If synchronisation reports that the existing Microsoft Entra federation issuer does not match this FoxIDs application registration, review the domain ownership before choosing to take over the federation. Taking over changes the Microsoft Entra domain to trust this FoxIDs application registration.
3 - Configure the users' Immutable ID claims
Microsoft Entra ID expects an Immutable ID claim in the WS-Federation token. The claim value must match the user's onPremisesImmutableId in Microsoft Entra ID.
The Microsoft Entra ID template adds the required issue claims and claim transforms. You still need to make sure each user has an immutable_id claim with the base64 value that matches the user in Microsoft Entra ID.
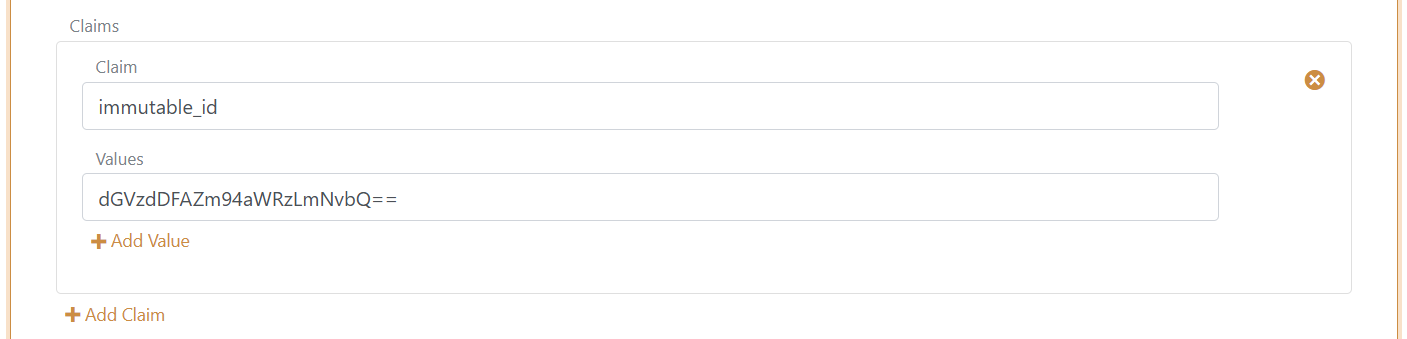
Microsoft Entra ID documentation lists the UPN claim as part of the expected WS-Federation token claims. FoxIDs issues:
http://schemas.xmlsoap.org/ws/2005/05/identity/claims/upn
from the user's upn claim. User matching is normally based on the Immutable ID, but adding the UPN claim keeps the token aligned with Microsoft's expected WS-Federation claim set.
You need to set the user's Immutable ID as a claim in FoxIDs. To set the Immutable ID on an internal user, select the Users tab and then the Internal Users tab, find the user, and add a claim with the claim type
immutable_idand the value of the Immutable ID in Microsoft Entra ID. It should be base64 encoded. Theimmutable_idclaim type is mapped to the SAML claim URIhttp://schemas.foxids.com/ws/identity/claims/immutableidin FoxIDs. To issue the UPN claim for an internal user, add a claim with the claim typeupnand the user's Microsoft Entra ID user principal name, e.g.user@your-domain.com. FoxIDs maps the internalupnclaim tohttp://schemas.xmlsoap.org/ws/2005/05/identity/claims/upn. Manual FoxIDs configuration
Use manual configuration only if you do not use the Microsoft Entra ID template.
- Wählen Sie die Registerkarte Anwendungen.
- Klicken Sie auf Neue Bewerbung.
- Klicken Sie auf Alle Optionen anzeigen.
- Klicken Sie auf Webanwendung mit dem Abzeichen WS-Federation.
- Fügen Sie den Namen hinzu, z. B.
Microsoft Entra ID. - Wählen Sie manuelle Konfiguration.
- Legen Sie Anwendungsbereich auf
urn:federation:MicrosoftOnlinefest. - Setzen Sie Antwort-URL auf
https://login.microsoftonline.com/login.srf. - Setzen Sie Abmelde-URL auf
https://login.microsoftonline.com/login.srf. - Behalten Sie als Token-Typ
SAML 1.1bei, es sei denn, Microsoft Entra ID ist für einen anderen Token-Typ konfiguriert. - Klicken Sie auf Erstellen.
- Öffnen Sie die Anwendung und aktivieren Sie Windows-Anmeldung mit Microsoft Entra ID in den erweiterten WS-Federation-Einstellungen.
Manual Immutable ID claim transform
Microsoft Entra ID erwartet einen Immutable ID-Claim im WS-Federation-Token. Der Claimswert muss mit der onPremisesImmutableId in der Microsoft Entra ID des Benutzers übereinstimmen.
- Klicken Sie auf Anwendung ändern, um die Anwendung im Bearbeitungsmodus zu öffnen.
- Wählen Sie die Registerkarte Claimstransformationen.
- Klicken Sie auf Claimstransformation hinzufügen und dann auf Zuordnen.
- Setzen Sie Neuen Claim auf
http://schemas.microsoft.com/LiveID/Federation/2008/05/ImmutableID. - Setzen Sie Claim auswählen auf
http://schemas.foxids.com/ws/identity/claims/immutableid. - Klicken Sie auf Aktualisieren.
Die Microsoft Entra ID-Dokumentation führt den UPN-Claim als Teil des erwarteten WS-Federation-Token-Claimsets auf. FoxIDs stellt Folgendes aus:
http://schemas.xmlsoap.org/ws/2005/05/identity/claims/upn
aus dem upn-Claim des Benutzers. Die Benutzerzuordnung basiert normalerweise auf der Immutable ID, aber der UPN-Claim hält das Token mit Microsofts erwartetem WS-Federation-Claimset im Einklang.
Sie müssen die Immutable ID des Benutzers als Claim in FoxIDs festlegen. Um die Immutable ID für einen internen Benutzer festzulegen, wählen Sie die Registerkarte Benutzer und dann die Registerkarte Interne Benutzer aus, suchen Sie den Benutzer und fügen Sie einen Claim mit dem Claimstyp
immutable_idund dem Wert der Immutable ID in Microsoft Entra ID hinzu. Es sollte Base64-codiert sein. Der Claimstypimmutable_idwird in FoxIDs dem SAML-Claims-URIhttp://schemas.foxids.com/ws/identity/claims/immutableidzugeordnet. Um den UPN-Claim für einen internen Benutzer auszustellen, fügen Sie einen Claim mit dem Claimtypupnund dem Microsoft Entra ID User Principal Name des Benutzers hinzu, z. B.user@your-domain.com. FoxIDs ordnet den internenupn-Claimhttp://schemas.xmlsoap.org/ws/2005/05/identity/claims/upnzu.
Manual Microsoft Entra ID federation values
Öffnen Sie die WS-Federation-Anwendungsregistrierung und kopieren Sie die für den Microsoft Entra ID-Domänenverbund erforderlichen Werte:
- Föderationsmetadaten
- Bereich / Emittent
- Passive Anmelde-URL
- Abmelde-URL
- MEX-Endpunkt
- Aktiver WS-Trust-Endpunkt
Microsoft Entra ID liest die FoxIDs Signaturzertifikate aus der Verbundmetadaten-URL. Daher können Sie weiterhin die standardmäßigen rollierenden FoxIDs Zertifikate verwenden. Für die föderierte Windows-Anmeldung verwenden Sie den MEX-Endpunkt als metadataExchangeUri und den aktiven WS-Trust-Endpunkt als activeSignInUri.
Konfigurieren Sie die Immutable ID des Benutzers
Die onPremisesImmutableId in der Microsoft Entra ID des Benutzers muss mit dem von FoxIDs ausgestellten http://schemas.microsoft.com/LiveID/Federation/2008/05/ImmutableID-Claim übereinstimmen.
Microsoft beschreibt den AD FS Immutable ID-Claim in der Dokumentation AD FS-Verwaltung und -Anpassung.
Konfigurieren Sie die Immutable ID des Benutzers mit PowerShell
- Stellen Sie eine Verbindung zu Microsoft Graph her:
Connect-MgGraph -Scopes "User.ReadWrite.All" - Richten Sie die Variablen ein:
$userId = "user-id@your-domain.com" $immutableId = "immutable-id" - Konfigurieren Sie die Immutable ID des Benutzers:
Update-MgUser -UserId $userId -OnPremisesImmutableId $immutableId - Validieren Sie den Wert:
Get-MgUser -UserId $userId | Format-List Id, UserPrincipalName, OnPremisesImmutableId
Wenn für den Benutzer bereits eine Immutable ID festgelegt ist, müssen Sie den Benutzer möglicherweise aus der Verbunddomäne entfernen, die Immutable ID aktualisieren und den Benutzer dann zurück zur Verbunddomäne verschieben.
Konfigurieren Sie die Microsoft Entra ID
Es ist nicht möglich, diese Art von Microsoft Entra ID-Domänenverbund unter Microsoft Entra ID Admin Center. zu konfigurieren. Verwenden Sie Microsoft Graph PowerShell oder Microsoft Graph API.
Die Microsoft Graph-Ressource internalDomainFederation unterstützt sowohl SAML als auch WS-Federation. Setzen Sie für WS-Federation preferredAuthenticationProtocol auf wsFed. Weitere Informationen finden Sie in der Dokumentation Erstellen Sie eine internalDomainFederation von Microsoft.
Öffnen Sie PowerShell als Administrator.
Installieren Sie das Microsoft Graph PowerShell-Modul, falls es noch nicht installiert ist:
Install-Module -Name Microsoft.GraphOptional für den aktuellen Benutzer installieren:
Install-Module Microsoft.Graph -Scope CurrentUser -ForceStellen Sie eine Verbindung zu Microsoft Graph her:
Connect-MgGraph -Scopes "Domain.ReadWrite.All,Directory.AccessAsUser.All"Richten Sie die Konfigurationsvariablen ein:
$domainId = "your-domain.com"
$displayName = FoxIDs
$issuerUri = "copied Realm / issuer from FoxIDs"
$metadataExchangeUri = "copied MEX endpoint from FoxIDs"
$passiveSignInUri = "copied Passive sign-in URL from FoxIDs"
$activeSignInUri = "copied Active WS-Trust endpoint from FoxIDs"
$signOutUri = "copied Sign-out URL from FoxIDs"
$signingCertificate = "copied IdP signing certificate from FoxIDs"
Konfigurieren Sie den Domänenverbund:
$params = @{ "@odata.type" = "#microsoft.graph.internalDomainFederation" displayName = $displayName issuerUri = $issuerUri metadataExchangeUri = $metadataExchangeUri passiveSignInUri = $passiveSignInUri activeSignInUri = $activeSignInUri preferredAuthenticationProtocol = "wsFed" signOutUri = $signOutUri federatedIdpMfaBehavior = "acceptIfMfaDoneByFederatedIdp" } New-MgDomainFederationConfiguration -DomainId $domainId -BodyParameter $paramsfederatedIdpMfaBehaviorkann eingestellt werden auf:acceptIfMfaDoneByFederatedIdp– Microsoft Entra ID akzeptiert MFA von FoxIDs; Wenn FoxIDs keine MFA durchgeführt hat, kann Microsoft Entra ID dies tun.enforceMfaByFederatedIdp– Wenn eine Richtlinie MFA erfordert, sendet Microsoft Entra ID den Benutzer zurück zu FoxIDs, um MFA abzuschließen.rejectMfaByFederatedIdp– Microsoft Entra ID führt MFA immer selbst durch; MFA bei FoxIDs wird ignoriert.
Validieren Sie die Konfiguration:
Get-MgDomainFederationConfiguration -DomainId $domainId | Format-List
Get-MgDomain -DomainId $domainId | Format-List Id, AuthenticationType
Microsoft Entra ID verwendet
passiveSignInUrifür webbasierte Clients undactiveSignInUrifür aktive Clients wie Microsoft Entra-verbundene und Microsoft Entra-Hybrid-verbundene Windows-Geräte. Die vollständige Eigenschaftsliste finden Sie in der Dokumentation internalDomainFederation-Ressource von Microsoft.
If you configure Microsoft Entra ID manually, update the Microsoft Entra ID
signingCertificateandnextSigningCertificatevalues when FoxIDs signing certificates roll over. Automatic federation handles this for you.
Automatische Microsoft Entra ID-Synchronisierung für Self-Hosting konfigurieren
Für selbst gehostete FoxIDs-Deployments benötigt die automatische Microsoft Entra ID federation sync eine Microsoft Entra ID app registration, die sowohl in der FoxIDs-Runtime- als auch in der FoxIDs-Control-Deployment-Konfiguration eingerichtet ist. FoxIDs verwendet die app registration mit dem client credentials flow, um Microsoft Graph aufzurufen und die federationConfiguration der Domäne zu erstellen oder zu aktualisieren.
Die app registration muss über die Microsoft Graph application permission Domain-InternalFederation.ReadWrite.All verfügen. Bevorzugen Sie certificate authentication, indem Sie das öffentliche Zertifikat in die app registration hochladen und FoxIDs mit demselben Zertifikat einschließlich privatem Schlüssel konfigurieren.
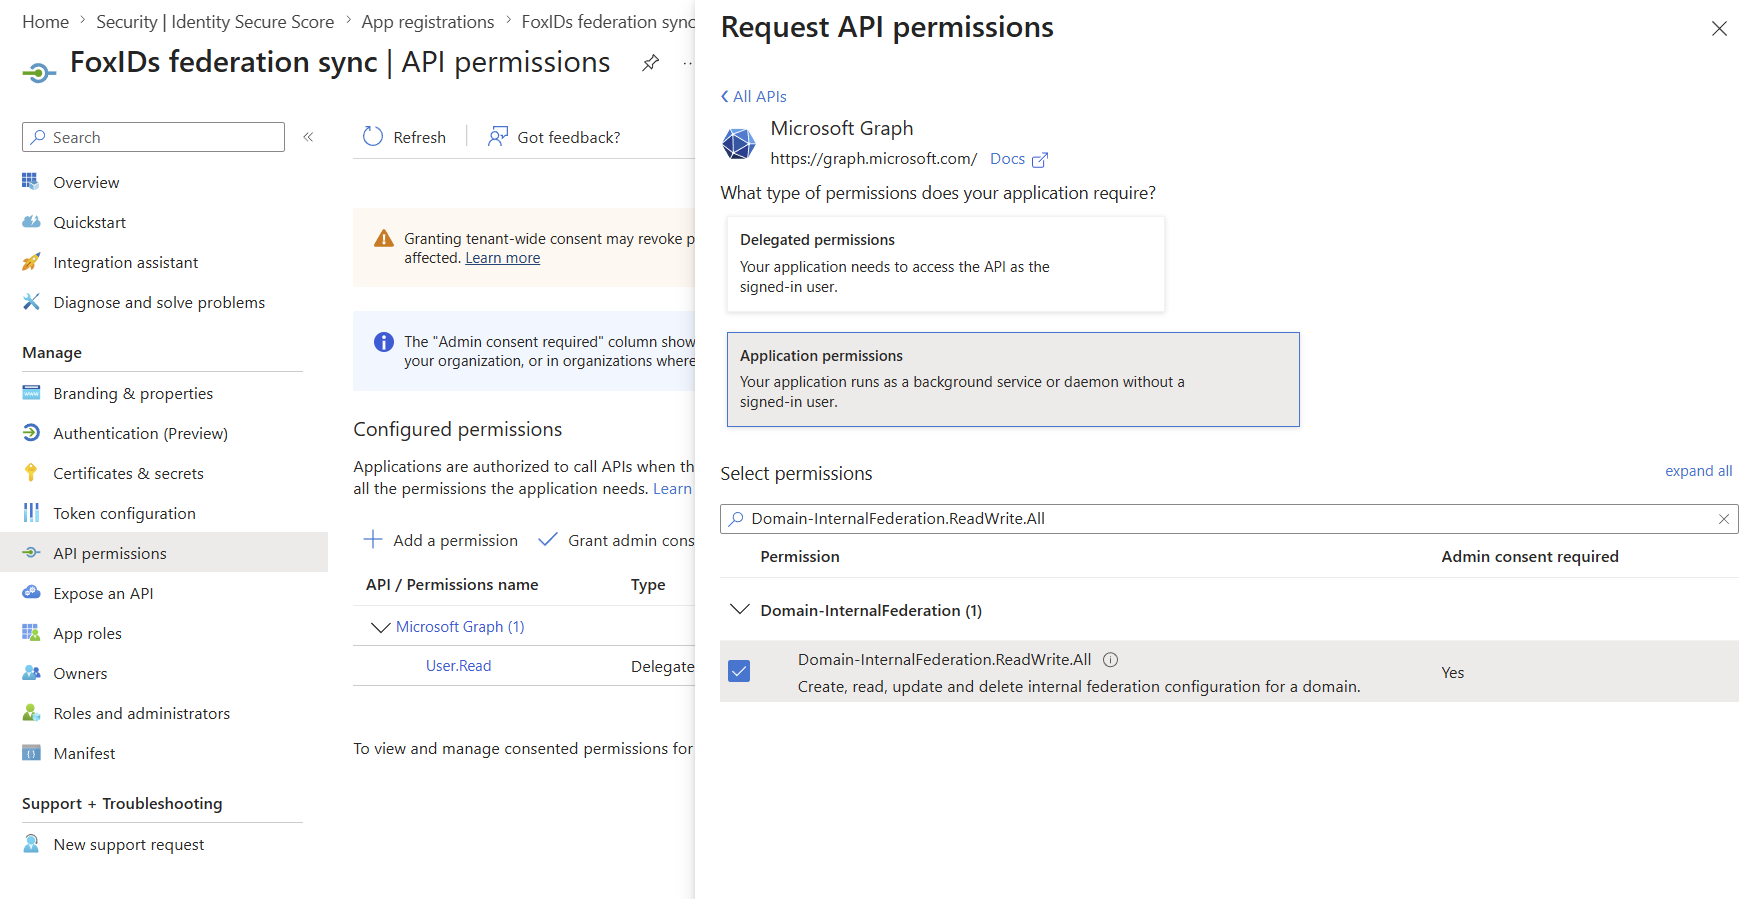
PFX ist praktisch für Deployment-Systeme, die secrets als einzeilige Werte speichern. Das PFX-Passwort ist optional; lassen Sie CertificatePfxPassword weg, wenn die PFX-Datei nicht passwortgeschützt ist:
{
  "Settings": {
    "Modules": {
      "MicrosoftEntraIdSync": {
        "ClientId": "<application-client-id>",
        "CertificatePfx": "<base64-encoded-pfx>",
        "CertificatePfxPassword": "<optional-pfx-password>"
      }
    }
  }
}
Als environment variables:
Settings__Modules__MicrosoftEntraIdSync__ClientId=<application-client-id>
Settings__Modules__MicrosoftEntraIdSync__CertificatePfx=<base64-encoded-pfx>
Settings__Modules__MicrosoftEntraIdSync__CertificatePfxPassword=<optional-pfx-password>
So erstellen Sie den base64-codierten PFX-Wert aus einem PFX-Zertifikat ohne Passwort:
$pfxPath = "C:\path\to\certificate.pfx"
$base64Pfx = [Convert]::ToBase64String([IO.File]::ReadAllBytes($pfxPath))
$base64Pfx | Set-Clipboard
PEM-Zertifikat und private key Text können ebenfalls verwendet werden:
{
  "Settings": {
    "Modules": {
      "MicrosoftEntraIdSync": {
        "ClientId": "<application-client-id>",
        "CertificatePemCrt": "-----BEGIN CERTIFICATE-----\n...\n-----END CERTIFICATE-----",
        "CertificatePemKey": "-----BEGIN PRIVATE KEY-----\n...\n-----END PRIVATE KEY-----"
      }
    }
  }
}
Wenn kein Zertifikat konfiguriert ist, verwendet FoxIDs client secret authentication:
{
  "Settings": {
    "Modules": {
      "MicrosoftEntraIdSync": {
        "ClientId": "<application-client-id>",
        "ClientSecret": "<client-secret>"
      }
    }
  }
}
Als environment variables:
Settings__Modules__MicrosoftEntraIdSync__ClientId=<application-client-id>
Settings__Modules__MicrosoftEntraIdSync__ClientSecret=<client-secret>
Wenn ein Zertifikat konfiguriert ist, verwendet FoxIDs immer certificate authentication und fällt bei einem Fehler nicht auf ClientSecret zurück. Konfigurieren Sie entweder CertificatePfx oder sowohl CertificatePemCrt als auch CertificatePemKey; konfigurieren Sie nicht sowohl PFX- als auch PEM-Zertifikateinstellungen.