Connect to Context Handler / FKA with SAML 2.0
FoxIDs can be connected to Context Handler with a SAML 2.0 authentication method.
Context Handler is a Danish identity broker connecting the Danish municipalities in a common federation, in Danish called Fælleskommunal Adgangsstyring (FKA).
Context Handler is connected as a SAML 2.0 Identity Provider (IdP) based on OIOSAML 3 and OCES3 (RSASSA-PSS).

By configuring an SAML 2.0 authentication method and a OpenID Connect application registration FoxIDs become a bridge between SAML 2.0 and OpenID Connect. FoxIDs will then handle the SAML 2.0 connection as a Relying Party (RP) / Service Provider (SP) and you only need to care about OpenID Connect in your application. If needed, you can possibly select multiple login option (authentication methods) from the same OpenID Connect application registration.
In test, you can log in with the FoxIDs test IdP.
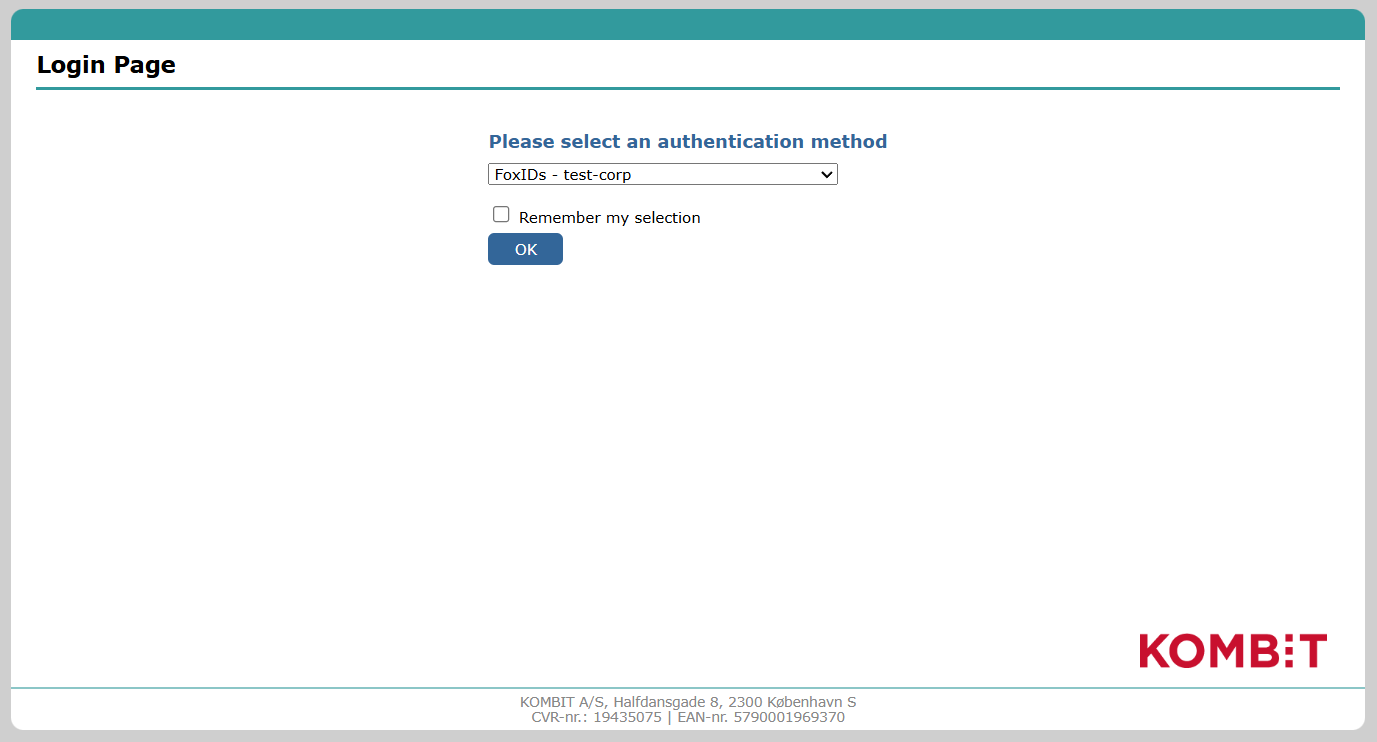
Or configure a FoxIDs environment as a test Identity Provider for Context Handler with a SAML 2.0 application registration and authenticate test users.

Context Handler can be configured based on either OIOSAML 2 or OIOSAML 3 with OCES3 (RSASSA-PSS) and FoxIDs furthermore support the required certificates and it is possible to support NSIS.
You can test Context Handler login with the online web app sample (sample docs) by clicking
Log inand thenDanish Context Handler TESTfor the test environment (selectFoxIDs - test-corpon the Context Handler log in page) orDanish Context Handlerfor production.
Take a look at the Context Handler sample configuration in FoxIDs Control: https://control.foxids.com/test-corp
Get read access with the userreader@foxids.comand passwordgEh#V6kSwthen select thecontext-handler,context-handler-testorcontext-handler-idp-testenvironment.
The sample is configured with a separate environments for the Context Handler SAML 2.0 integration.
Context Handler / FKA documentation:
- Context Handler guide.
- Administration portal
- Context Handler test application
Transform the DK privilege XML claim to a JSON claim.
Separate environment
Context Handler requires each connection in an environment (test or production) to use a unique OCES3 certificate.
Therefore, consider connecting Context Handler in separate environments where the OCES3 certificates can be configured.

Create a new environment in FoxIDs Control Client:
- Find the Environments section in the top middle
- Click the drop-down
- Click New environment

- Add the Name
- Click Create
If you both configure a test and production environment, they should be placed in separate environments. If you configure a test Identity Provider for Context Handler, it should also be placed in a separate environment and have a unique OCES3 certificate.
You can easily connect two environments in the same tenant with an Environment Link.
Certificate
Context Handler requires all requests (authn and logout) to be signed with production OCES3 certificates in all environments. It is NOT possible to use a certificate issued by another certificate authority, a self-signed certificate or test OCES3 certificates.
A OCES3 certificate is valid for three years. After that, it must be updated manually.
Add the .P12 OCES3 certificate in FoxIDs Control Client:
- Select (or create) a separate environment to be used for Context Handler as Identity Provider or a test Identity Provider for Context Handler
- Select the Certificates tab
- If not configured for contained certificates. Click the arrow down on the Swap certificate button and then in the Contained certificates section click Change container type
- Click on the primary certificate 5, Add the password in Optional certificate password
- Upload the
.P12OCES3 certificate
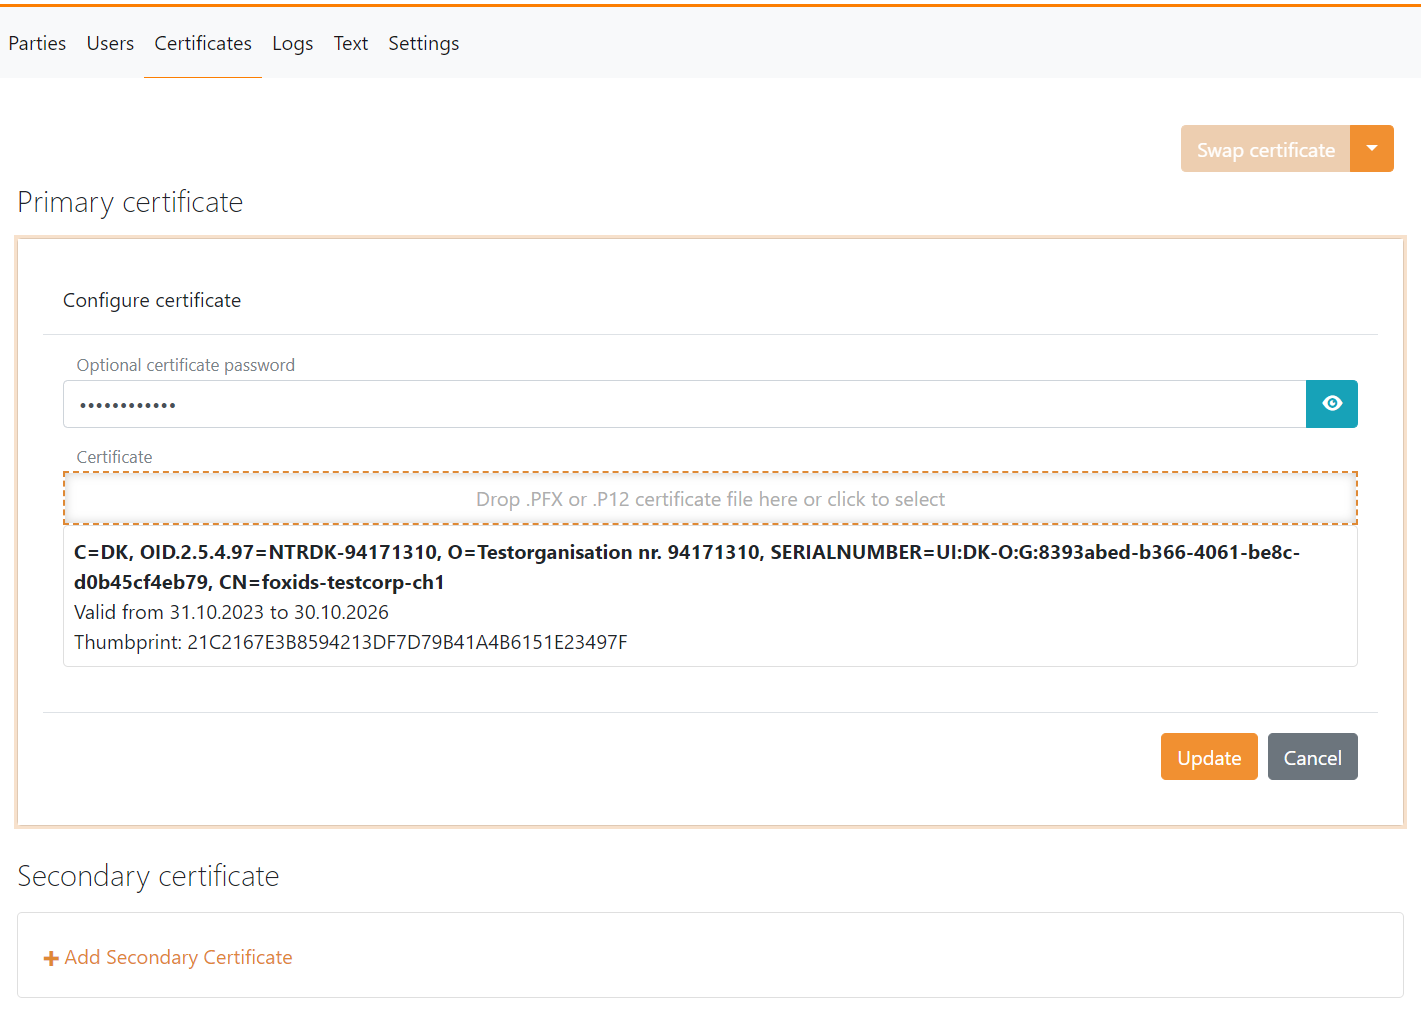
It is subsequently possible to add a secondary certificate and to swap between the primary and secondary certificates.
Configuring Context Handler as Identity Provider
This guide describe how to setup Context Handler as a SAML 2.0 Identity Provider and comply to OIOSAML3.
You need to configure the OCES3 certificate before following this guide.
1 - Start by creating an SAML 2.0 authentication method in FoxIDs Control Client
- Select the Authentication tab
- Click New authentication and then Identity Provider (SAML 2.0)
- Add the Name e.g.
Context Handler - Add the Context Handler IdP metadata in the Metadata URL field
Test metadata:https://n2adgangsstyring.eksterntest-stoettesystemerne.dk/runtime/saml2/metadata.idp
Production metadata:https://n2adgangsstyring.stoettesystemerne.dk/runtime/saml2/metadata.idp - Click Create
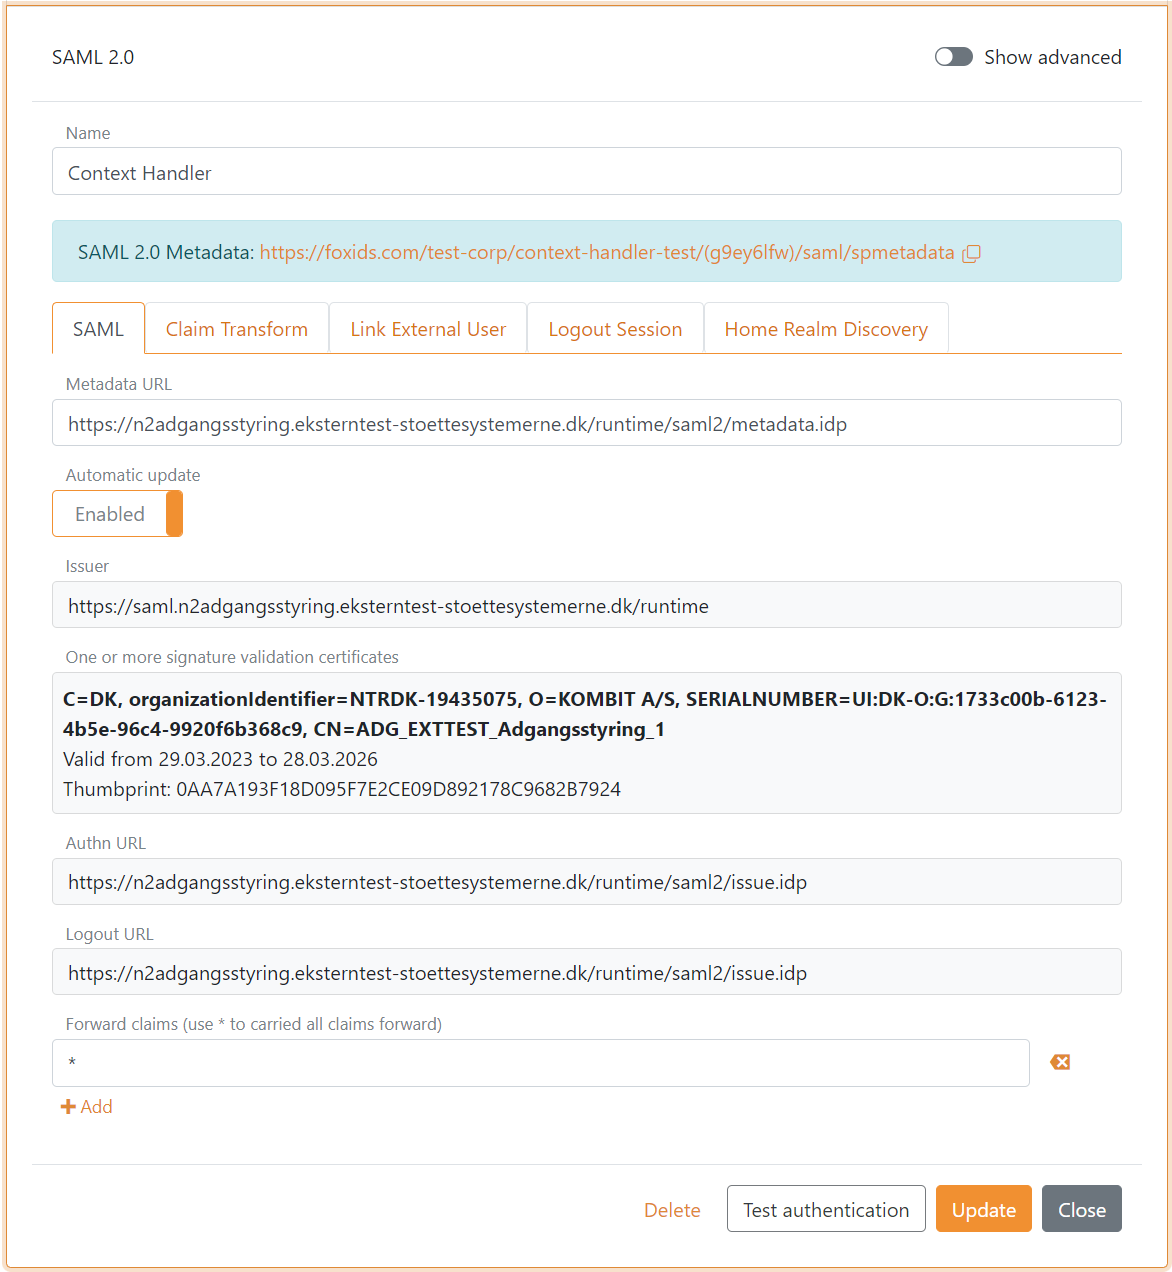
- Select Show advanced
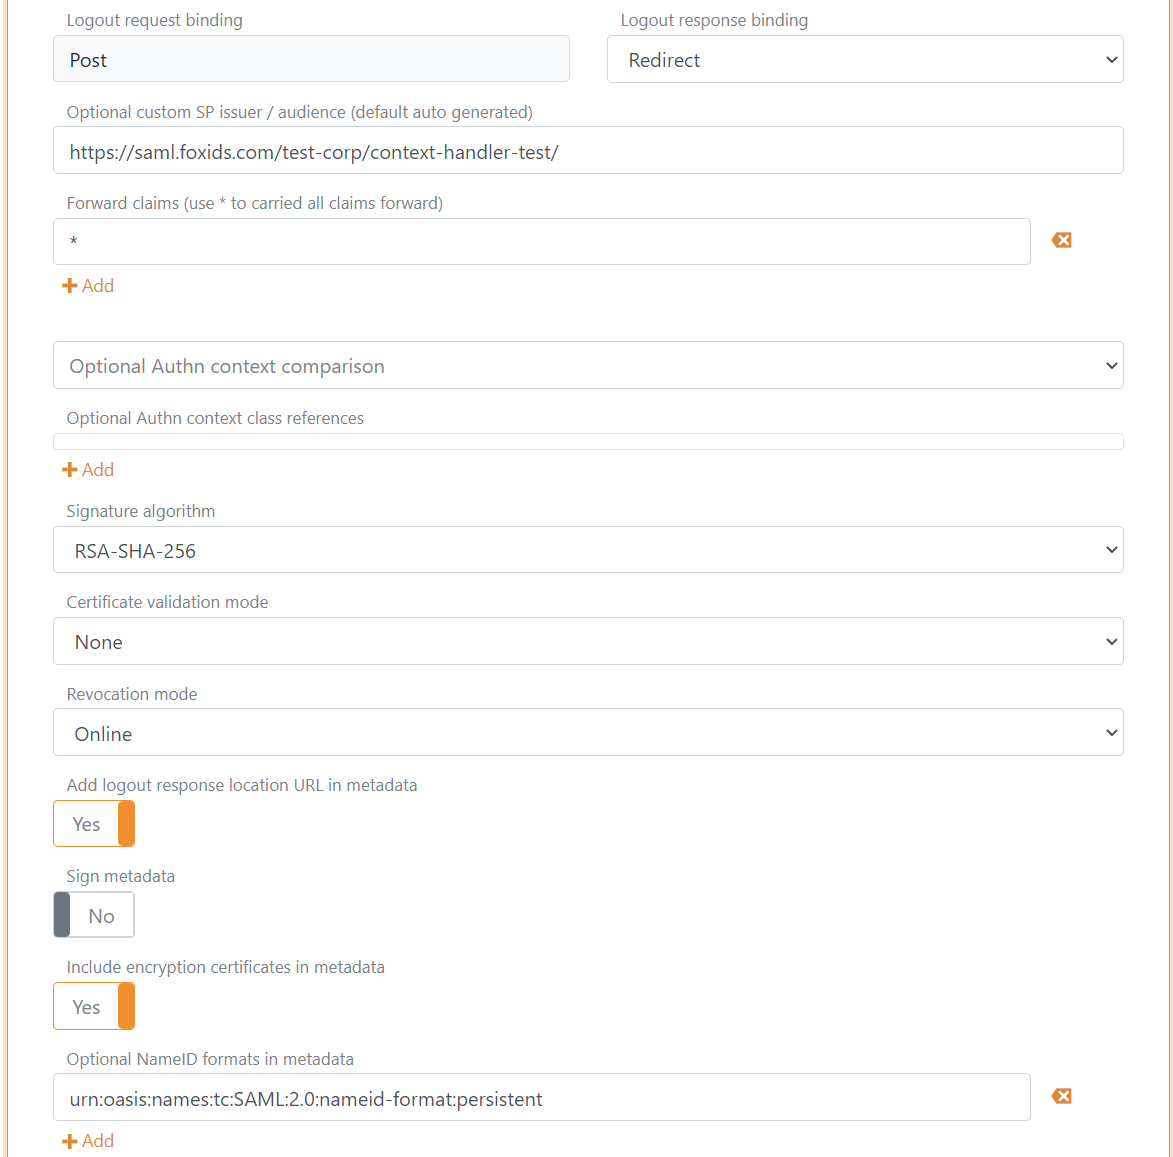
- Set Logout response binding to Redirect
- Configure a Custom SP issuer, the issuer can optionally start with
https://saml.The issuer in this example ishttps://saml.foxids.com/test-corp/context-handler-test/ - Optionally set the Certificate validation mode to Chain trust if the OCES3 root certificate is trusted on your platform Set the Certificate revocation mode to Online
- Select Yes in Add logout response location URL in metadata
- Select Yes in Include the encryption certificate in metadata
- Set the NameID format in metadata to
urn:oasis:names:tc:SAML:2.0:nameid-format:persistent
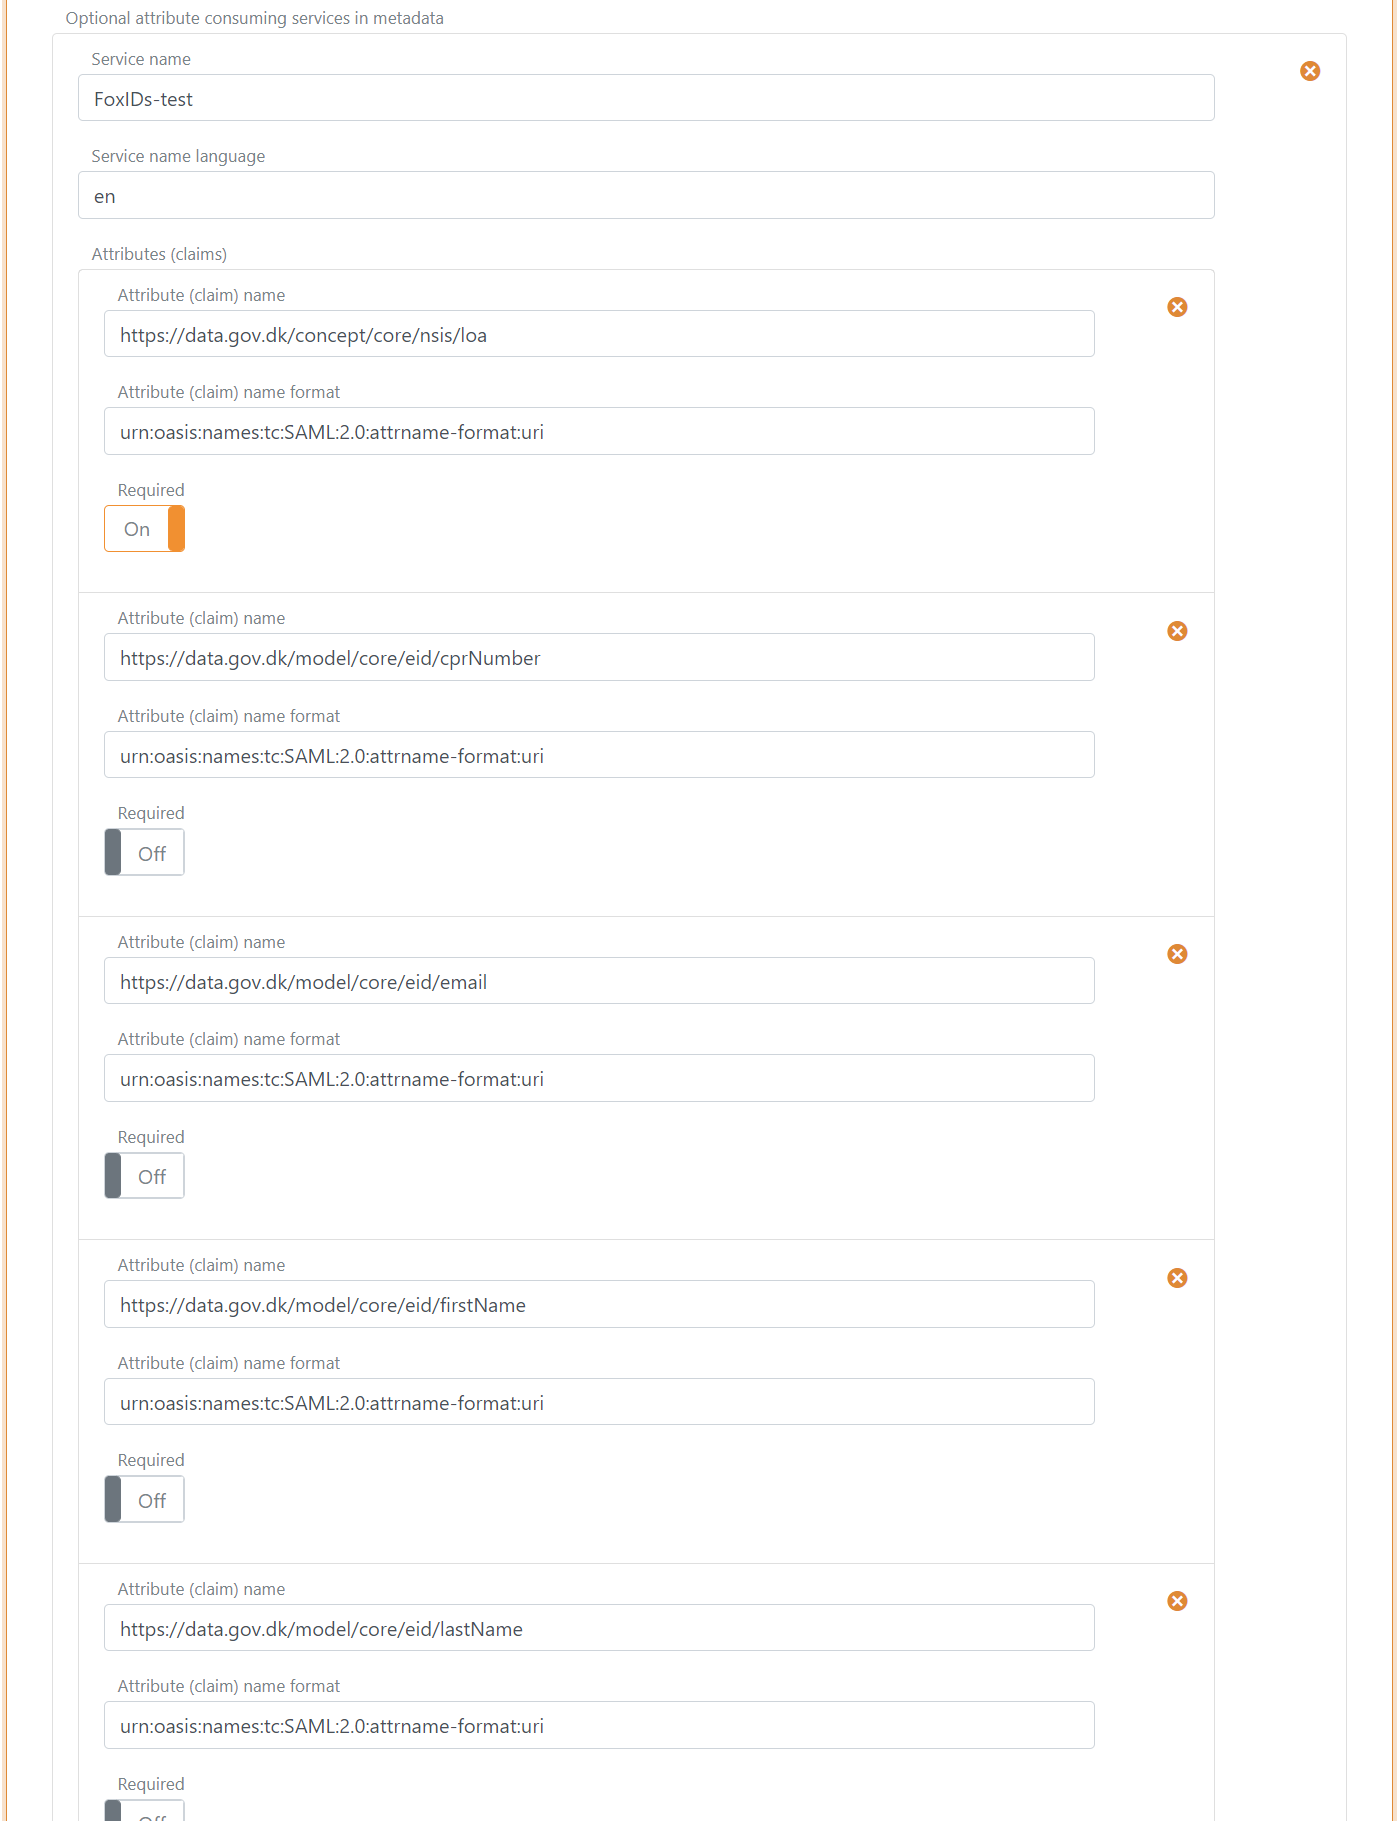
- In Attribute consuming service in metadata, click Add attribute consuming service and add the Service name
- Add all the claims you want to receive as requested attributes with the format
urn:oasis:names:tc:SAML:2.0:attrname-format:uri. Optionally set each attribute as required.
The following claims is most often used:
https://data.gov.dk/model/core/specVersionhttps://data.gov.dk/concept/core/nsis/loahttps://data.gov.dk/model/core/eid/professional/cvrhttps://data.gov.dk/model/core/eid/professional/orgNamehttps://data.gov.dk/model/core/eid/cprNumberhttps://data.gov.dk/model/core/eid/emailhttps://data.gov.dk/model/core/eid/firstNamehttps://data.gov.dk/model/core/eid/lastNamehttps://data.gov.dk/model/core/eid/privilegesIntermediate
- In Contact persons in metadata, click Add contact person and click Administrative to add a administrative contact person
- Click Update
- Go to the top of the SAML 2.0 authentication method
- Find the SP-metadata in SAML 2.0 method URL, in this case https://foxids.com/test-corp/context-handler-test/(g9ey6lfw)/saml/spmetadata.
- The SP-metadata URL is used to configure a Context Handler user system (DK: brugervendt system).
2 - Then go to the Context Handler administration portal in Test or Production
- Select IT-systems (DK: IT-systemer)
- Click Add IT-system (DK: Tilslut it-system)
- Fill out the fields and select User system (DK: Brugervendt system)
- Go to the User system tab (DK: Brugervendt system)
- Select Context Handler with NSIS and remove the selection of Context Handler (without NSIS)
- Select OIOSAML3 as OIOSAML profile and NSIS level
- Add the SAML 2.0 authentication method SP-metadata URL, in this case
https://foxids.com/test-corp/context-handler-test/(g9ey6lfw)/saml/spmetadata. - Fill out the rest, accept the terms and click Save (DK: Gem)
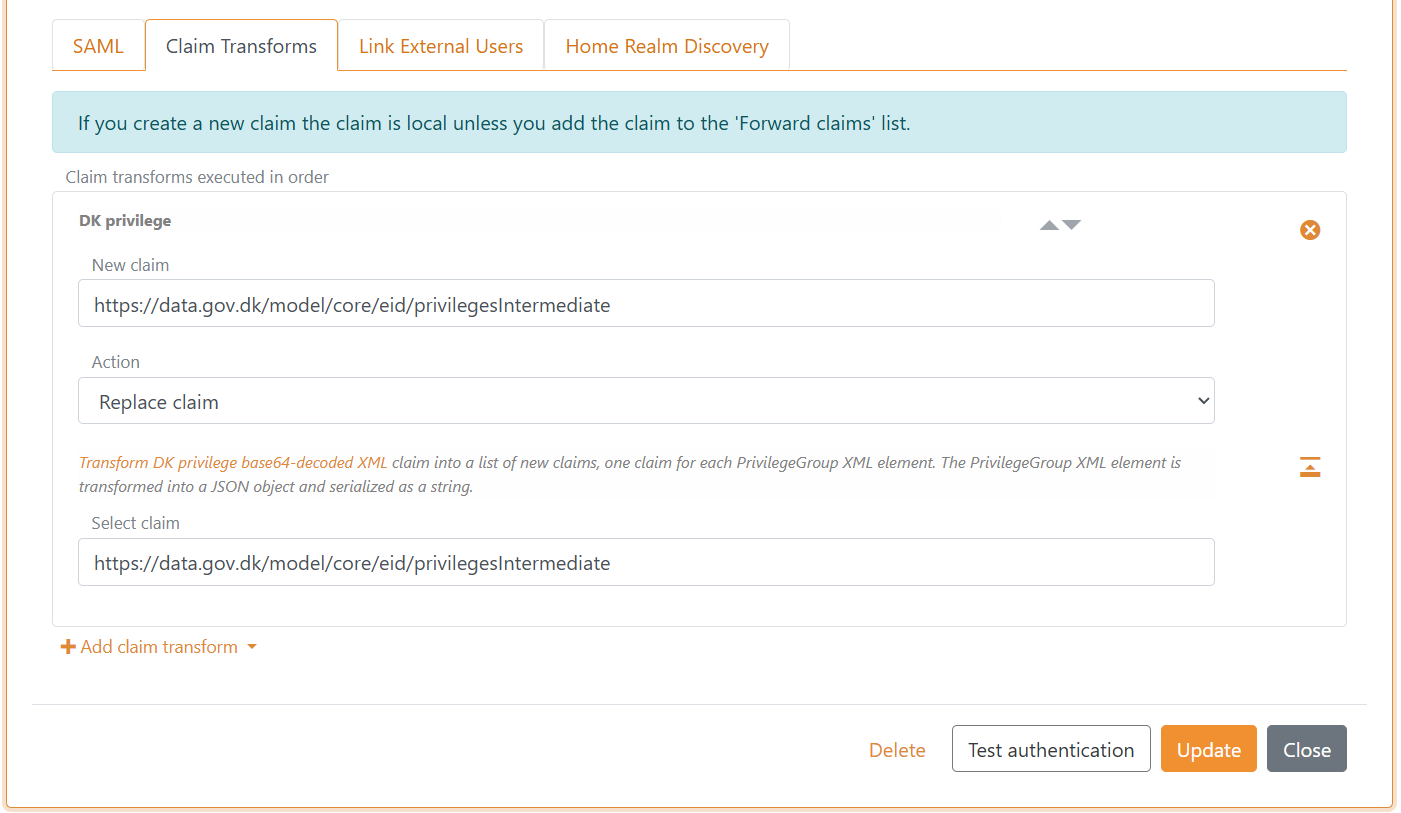
3 - Add privilege claim transformation in FoxIDs Control Client
FoxIDs can transform the DK privilege XML claim to a JSON claim. It is recommended to add the transformation in order to obtain smaller claims and tokens. Furthermore, it makes the tokens readable.
- Select the Claim transform tab
- Click Add claim transform and click DK XML privilege to JSON
- Click Update
FoxIDs internally converts SAML 2.0 claims to JWT claims. The mapping between SAML 2.0 and JWT claims is automatically created by default. You can find and change the mapping in the Settings tab.
You are done. The SAML 2.0 authentication method can now be used as an authentication method for application registrations in the environment.
A application registration will only issue added claims.
Therefore, remember to add the JWT claims to OpenID Connect application registrations or use the*notation.
Configuring test Identity Provider for Context Handler
This guide describe how to configured FoxIDs as a test Identity Provider for Context Handler. Context Handler is added as a SAML 2.0 Relying Party.
You need to use a separate environment to have a place for the test users and to configure the OCES3 certificate before following this guide.
1 - Start by creating an SAML 2.0 application registration in FoxIDs Control Client
Select the Applications tab
Click New application
Select Show advanced
Select Web Application (SAML 2.0)
Add the Name e.g.,
Context Handler IdPDownload the Context Handler RP metadata where you can find endpoints and the certificate to trust.
Test metadata:https://n2adgangsstyring.eksterntest-stoettesystemerne.dk/runtime/saml2auth/metadata.idp
The certificate is base64 encoded and can be converted into a certificate file.cerwith the FoxIDs certificate tool.Add the Application issuer
https://saml.n2adgangsstyring.eksterntest-stoettesystemerne.dk/runtimeand the metadataAdd the Assertion consumer service (ACS) URL
https://n2adgangsstyring.eksterntest-stoettesystemerne.dk/runtime/saml2auth/consume.idpfrom the metadata
Click Register
Read the Metadata URL and save it for later
Click Close
The detailed configuration opens, select Show advanced in the top right corner of this configuration section
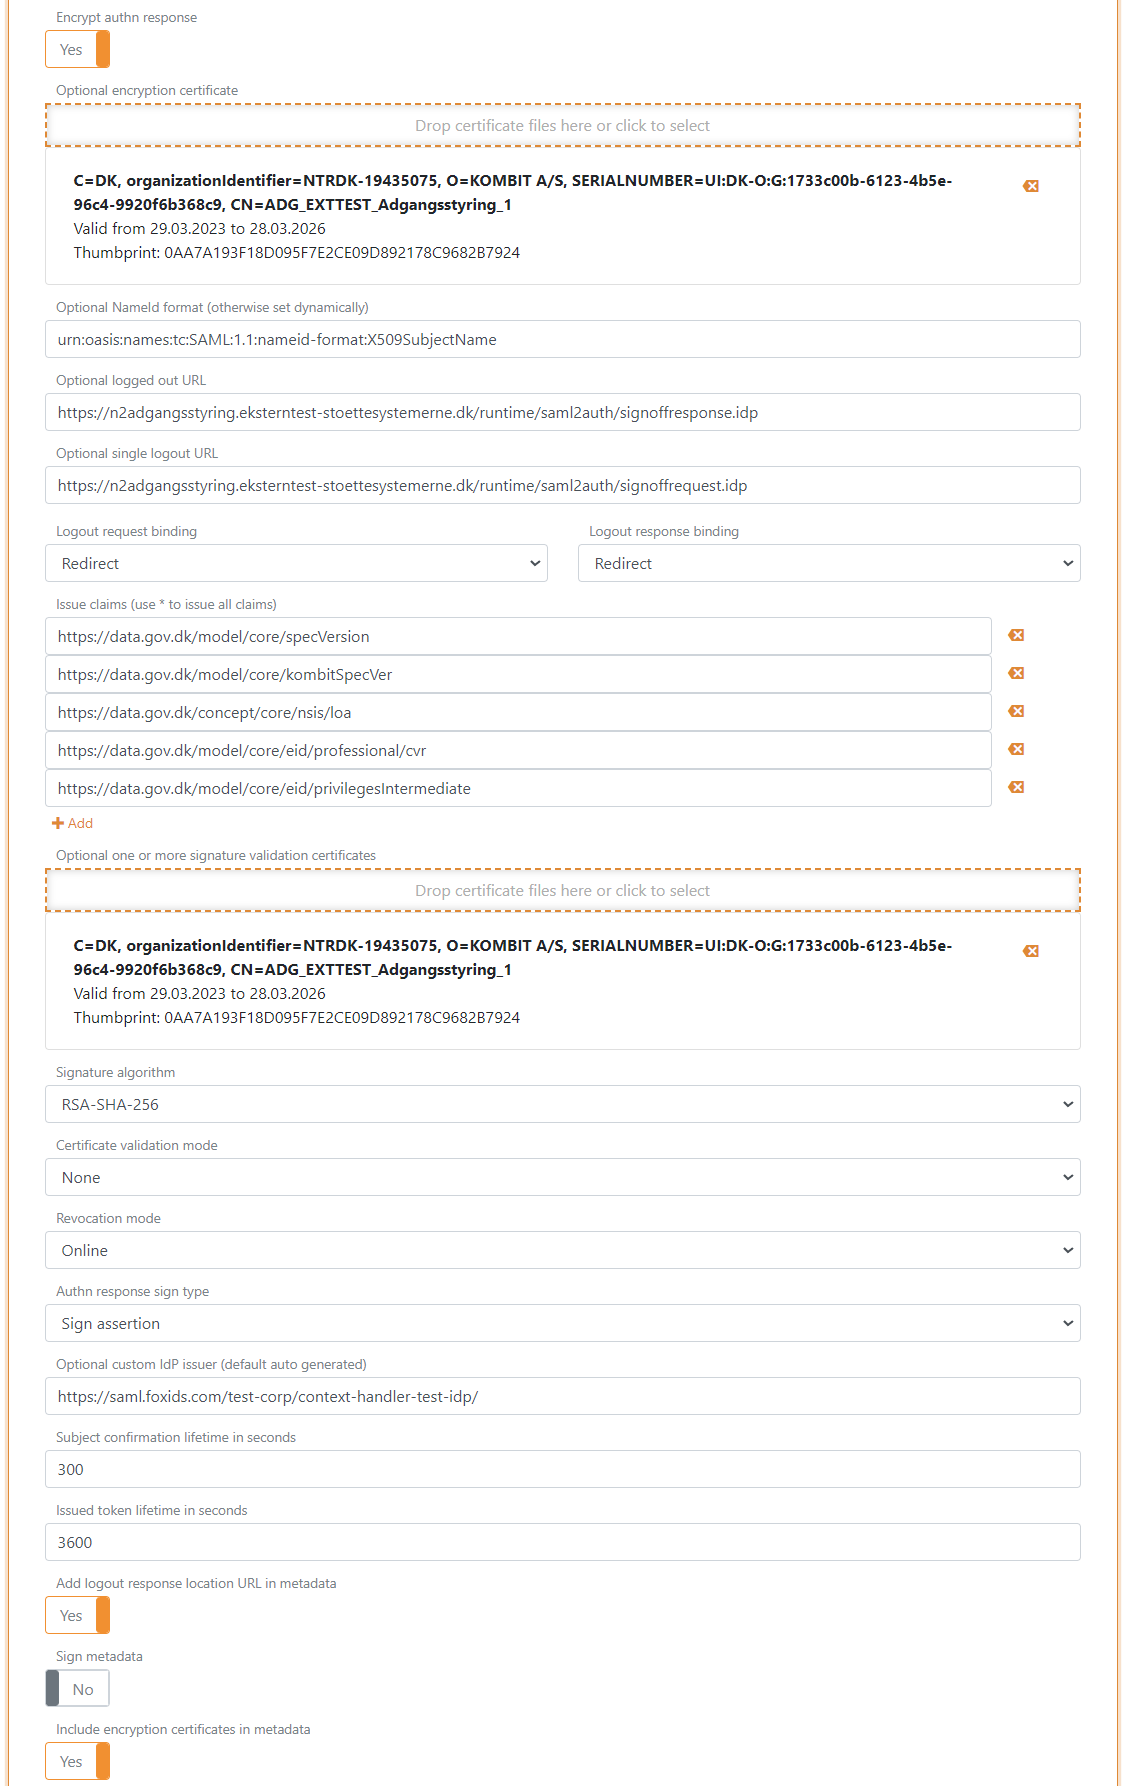
Enable Absolute ACS URL
Set Encrypt authn response to Yes
Add the encryption certificate from the metadata in Encryption certificate
Set the NameID format to
urn:oasis:names:tc:SAML:1.1:nameid-format:X509SubjectNameAdd the Logged out URL
https://n2adgangsstyring.eksterntest-stoettesystemerne.dk/runtime/saml2auth/signoffresponse.idpfrom the metadataAdd the Single logout out URL
https://n2adgangsstyring.eksterntest-stoettesystemerne.dk/runtime/saml2auth/signoffrequest.idpfrom the metadataSet the Logout request binding and the Logout response binding to redirect
Set the OIOSAML3 claims which should be issued to Context Handler in Issue claims
The following claims is most often used:
https://data.gov.dk/model/core/specVersionhttps://data.gov.dk/model/core/kombitSpecVerhttps://data.gov.dk/concept/core/nsis/loahttps://data.gov.dk/model/core/eid/professional/cvrhttps://data.gov.dk/model/core/eid/privilegesIntermediate
- Add the signing certificate from the metadata in Signature validation certificate
- Optionally the Certificate validation mode to Chain trust if the OCES3 root certificate is trusted on your platform Set the Certificate revocation mode to Online
- Set Authn response sign type to Sign assertion
- Configure a Custom IdP issuer, the issuer can optionally start with
https://saml.The issuer in this examplehttps://saml.foxids.com/test-corp/context-handler-test-idp/ - Select Yes in Add logout response location URL in metadata
- Select YEs in Include the encryption certificate in metadata
- In Contact persons in metadata, click Add contact person and click Administrative to add a administrative contact person
- Click Update
- Go to the top of the SAML 2.0 application section
- Find the test IdP-metadata in SAML 2.0 Metadata, in this case
https://foxids.com/test-corp/context-handler-idp-test/ch-idp(*)/saml/idpmetadata
The test IdP-metadata is used to configure the Context Handler identity provider.
2 - Then go to the Context Handler administration portal in Test
- Select IT-systems (DK: IT-systemer)
- Click Add IT-system (DK: Tilslut it-system)
- Fill out the fields and select Identity Provider
- Go to the Identity Provider tab
- Select Context Handler with NSIS and remove the selection of Context Handler (without NSIS)
- Select OIOSAML3 as OIOSAML profile and NSIS level
- Add the test IdP-metadata URL, in this case
https://foxids.com/test-corp/context-handler-idp-test/ch-idp(*)/saml/idpmetadata. - Fill out the rest, accept the terms and click Save (DK: Gem)
You are required to be registered as your own test authority (DK: egen test myndighed) in the test environment to add a federation agreement. A federation agreement (DK: føderationsaftaler) is required to enable the identity provider in Context Handler.
3 - Add claim transformation in FoxIDs Control Client
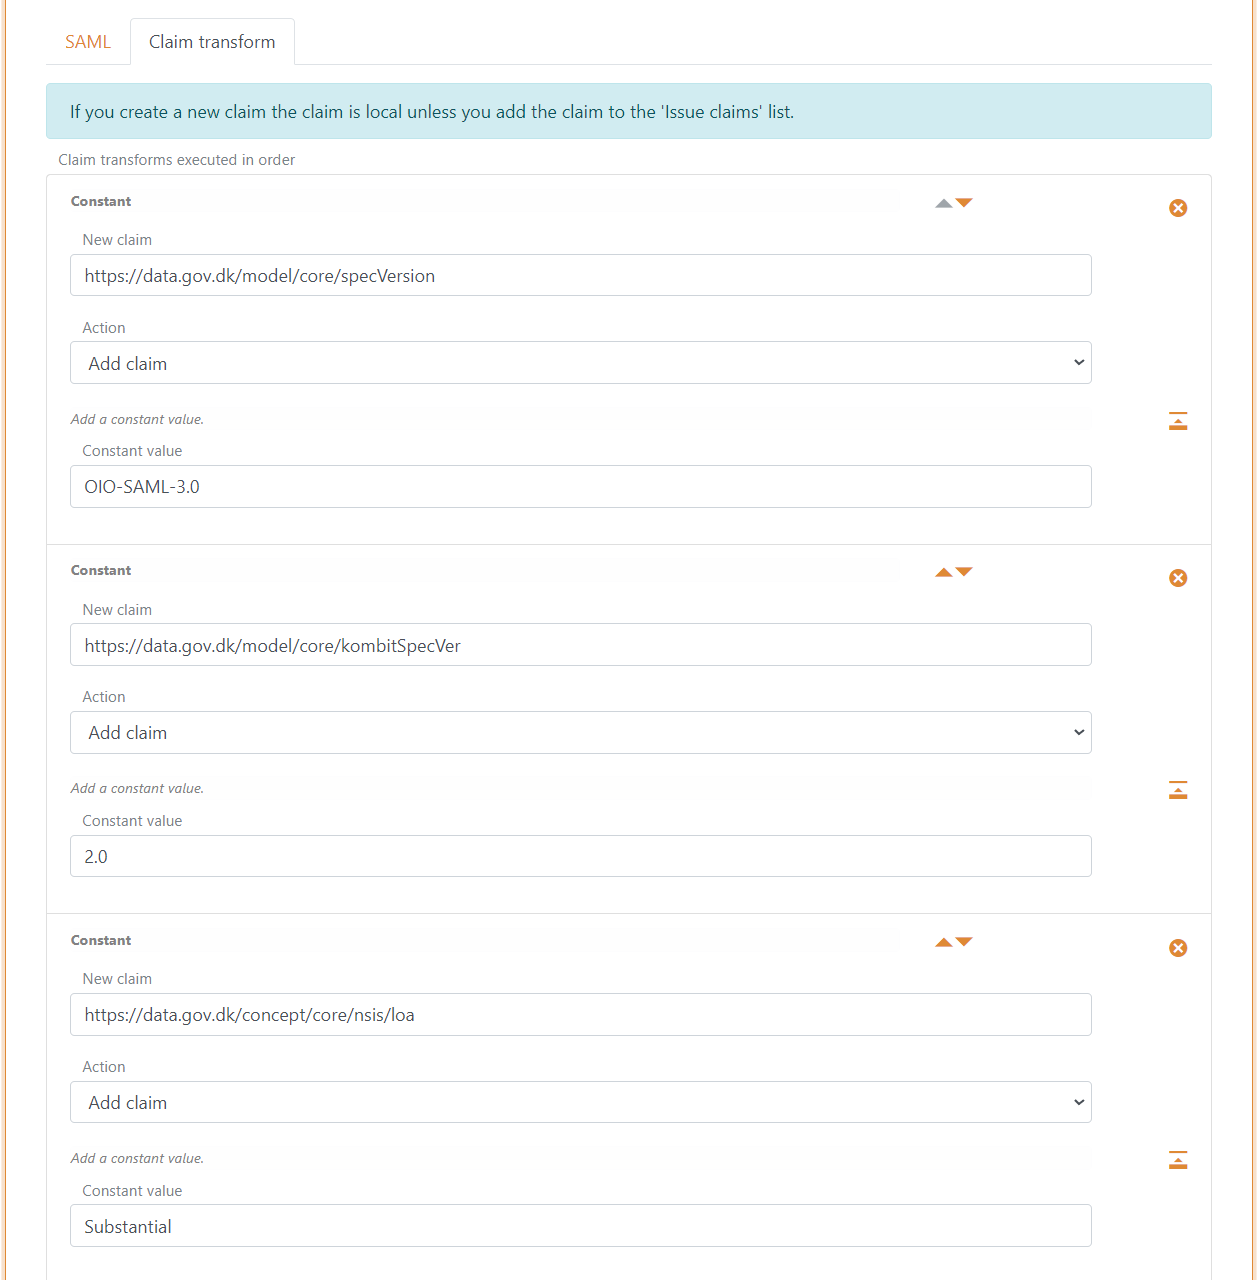
Create the claims which has to be issued to Context Handler in claim transforms.
- Go back to the SAML 2.0 application
Context Handler IdP - Select the Claim transforms tab
- Add a Constant claim
https://data.gov.dk/model/core/specVersionwith the valueOIO-SAML-3.0 - Add a Constant claim
https://data.gov.dk/model/core/kombitSpecVerwith the value2.0 - Add a Constant levels of assurance (loa) claim
https://data.gov.dk/concept/core/nsis/loawith e.g. the valueSubstantialor read the claim through the claims pipeline
- Add a Concatenated claim to replace the NameID
http://schemas.xmlsoap.org/ws/2005/05/identity/claims/nameidentifierclaim which a concatenated version of the CVR number, display name and unique user ID - Select Action Replace claim
- Concatenate claims:
https://data.gov.dk/model/core/eid/professional/cvrhttp://schemas.xmlsoap.org/ws/2005/05/identity/claims/givennamehttp://schemas.xmlsoap.org/ws/2005/05/identity/claims/surnamehttp://schemas.xmlsoap.org/ws/2005/05/identity/claims/nameidentifier
- Set the Concatenate format string to
C=DK,O={0},CN={1} {2},Serial={3}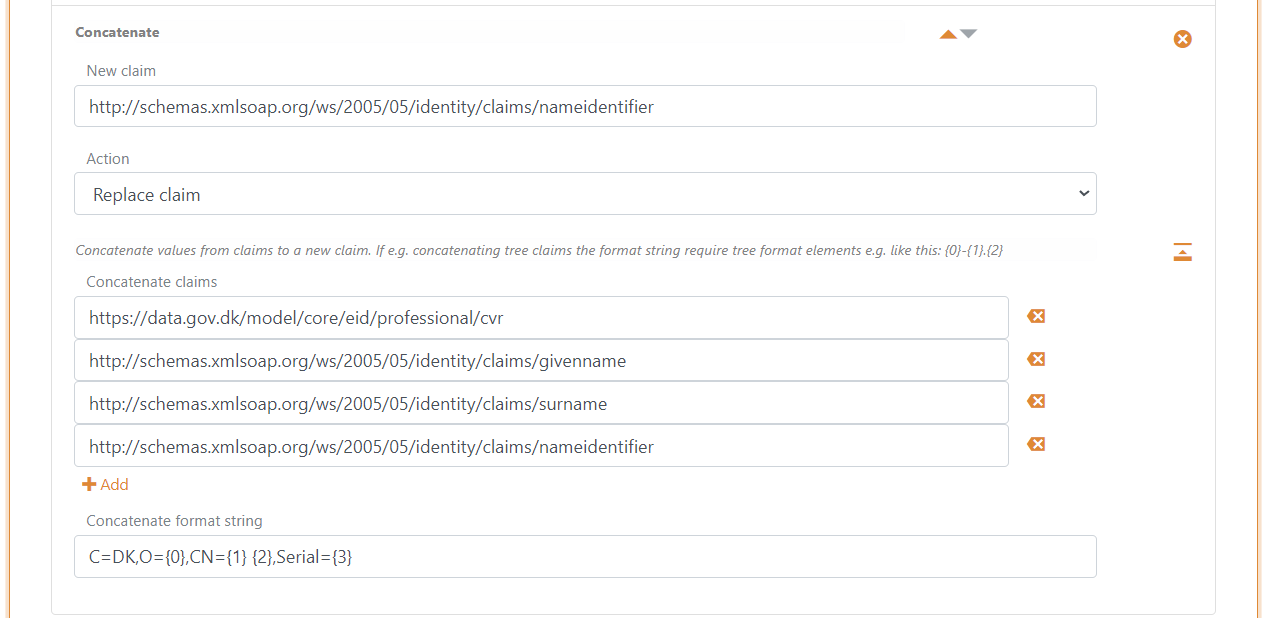
- Click Update
4 - Add SAML 2.0 claim to JWT claim mappings in FoxIDs Control Client
FoxIDs internally converts SAML 2.0 claims to JWT claims. Context Handler use a OIOSAML3 defined set of SAML 2.0 claims where corresponding JWT mappings need to be added in the environment.
- Go to Settings tab and Claim mappings
- Click Add claim mapping for all the claims configured in step 1.20, you can create you own short JWT claim names if no standard name exists (or edit the claim mappings if they already exist)
- Click Update
5 - Add test users in FoxIDs Control Client
You can add test uses with test claims in the Users tab and sub Internal Users tab.
Test claims on test users is JWT based and mapped to SAML 2.0 claims.
Each test user is required to have a CVR cvr claim, given name given_name claim, family name family_name claim and optionally a privilege claim with a base64 encoded DK privilege XML string value.
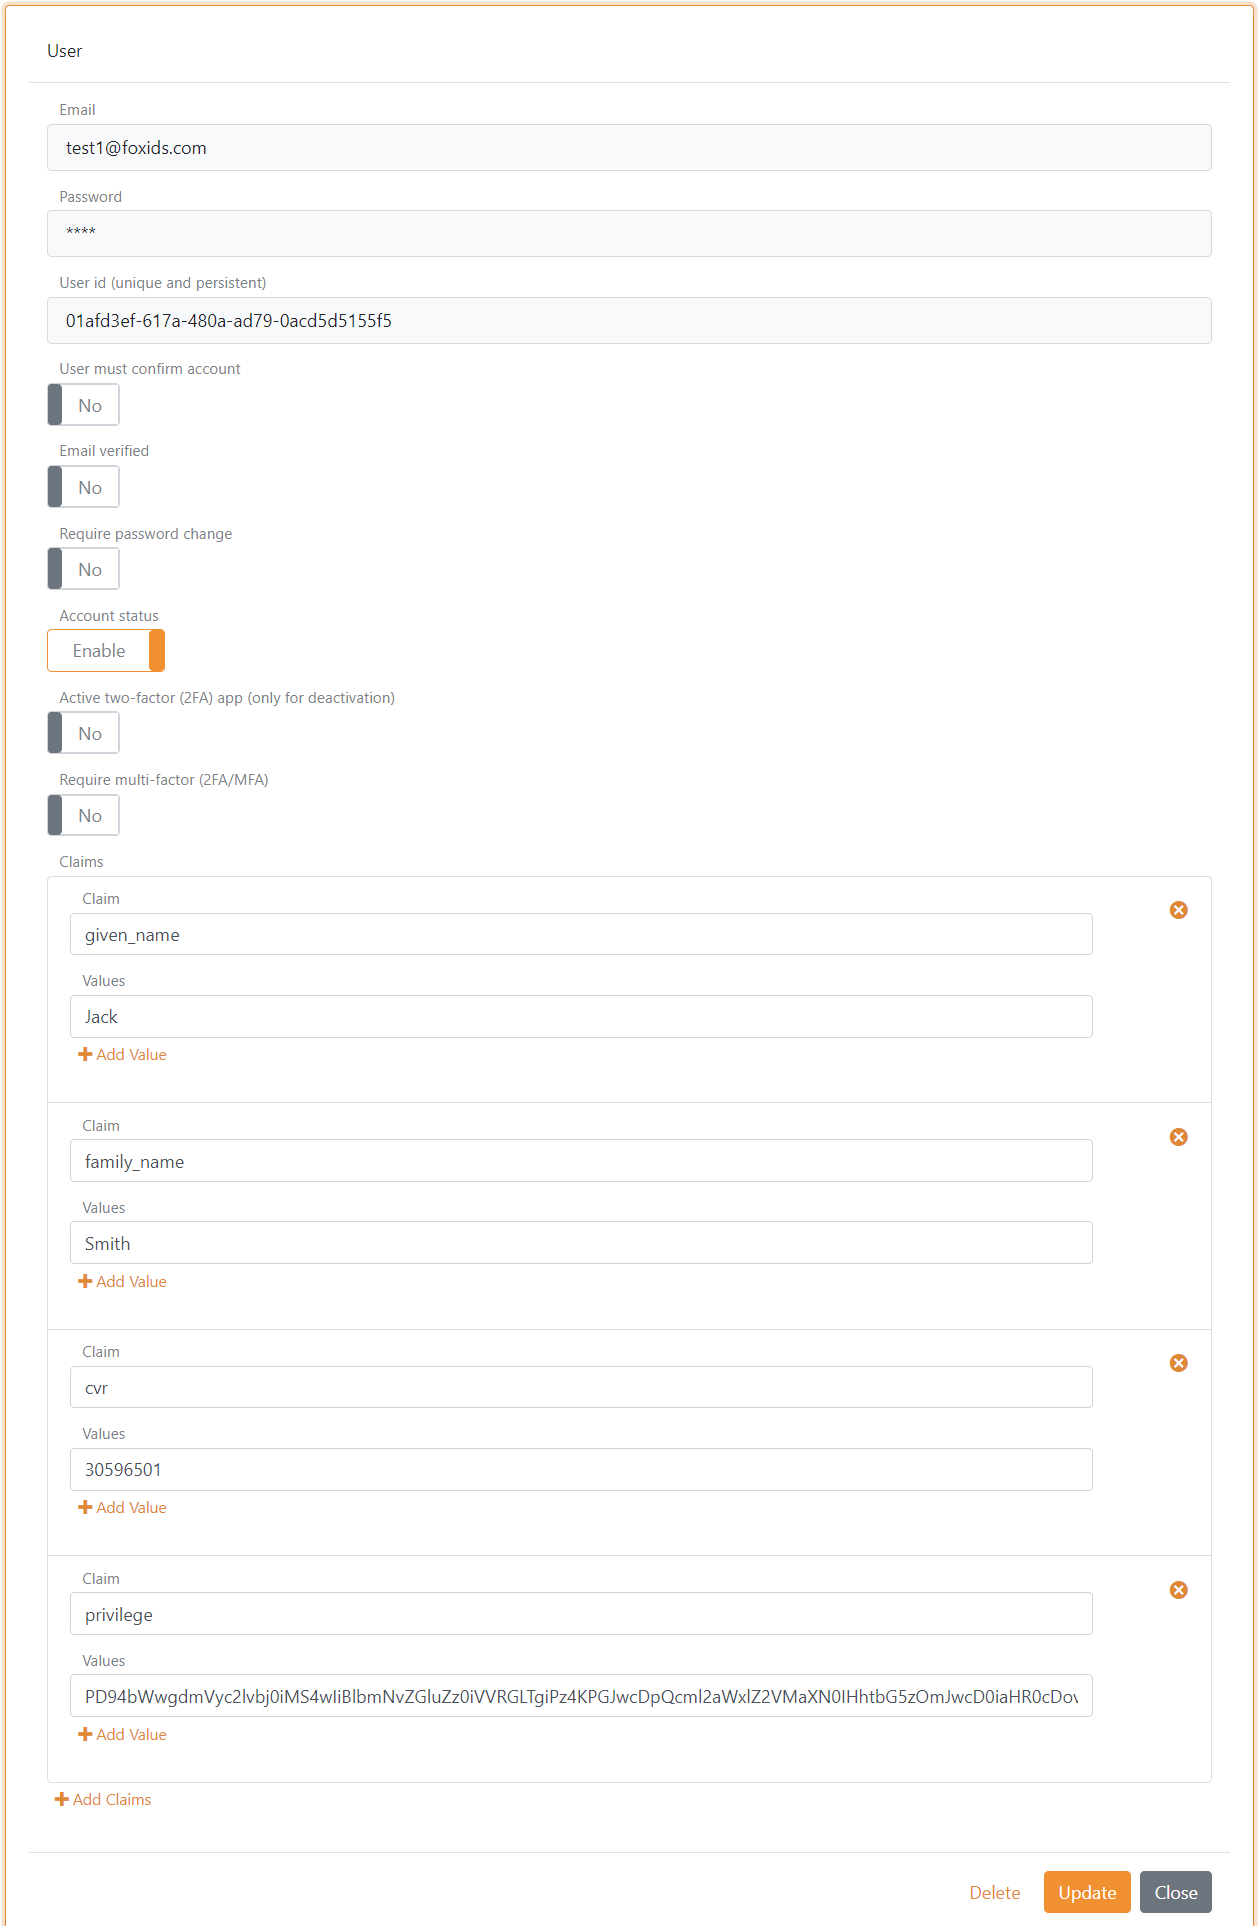
If the user should have the Job function role (DK: Jobfunktionsrolle) http://foxids.com/roles/jobrole/test-corp-admin_access/1 the DK privilege XML would be (with test CVR number: 11111111):
<?xml version="1.0" encoding="UTF-8"?>
<bpp:PrivilegeList xmlns:bpp="http://digst.dk/oiosaml/basic_privilege_profile" xmlns:xsi="http://www.w3.org/2001/XMLSchema-instance" >
    <PrivilegeGroup Scope="urn:dk:gov:saml:cvrNumberIdentifier:11111111">
        <Privilege>http://foxids.com/roles/jobrole/test-corp-admin_access/1</Privilege>
    </PrivilegeGroup>
</bpp:PrivilegeList>