Windows Server with IIS
Deploy FoxIDs on Windows Server with Internet Information Services (IIS).
This is a description of how to do a default deployment and log in for the first time.
A FoxIDs installation is like a bucket, there is no external dependencies and it's easy to archive a very high uptime with little effort.
FoxIDs are updated by downloading the FoxIDs-x.x.x-win-x64.zip file from the new release and then updating the files in the two websites (not overriding appsettings.json).
New FoxIDs releases is backwards compatible, please consult the release notes before updating.
A valid license is required to access the FoxIDs releases, where you can download the required deployment files.
Pre requirements:
- You have a Windows Server (or Windows 10/11) with Internet Information Services (IIS).
- You have basic knowledge about Windows Servers and IIS.
This guid describe how to install FoxIDs on a single server but you can divide the installation on to different servers.
This deployment include:
- Two websites one for FoxIDs and one for the FoxIDs Control (Admin Client and API).
- The two websites are exposed on two different domains / sub-domains.
- NoSQL database containing all data including tenants, environments and users. Either deploy MongoDB Community Edition or PostgreSQL.
- FoxIDs logs are default saved in files. Depending on the load, consider to use OpenSearch in production.
Deployment
The deployment is carried out in the described order.
Install database
Download and install MongoDB Community Edition or download and install PostgreSQL.
MongoDB
A self-managed MongoDB deployment is default installed with access control disabled. Consider to configure MongoDB authentication depending on your installation.
MongoDBs default endpoint / connection string: mongodb://localhost:27017
You can install the MongoDB Compass (GUI) with the MongoDB Community Edition or download and install the MongoDB admin application separately.
PostgreSQL
PostgreSQL is default deployed with the user postgres and a password provided by you during installation.
- Open pgAdmin and create a database for FoxIDs called
FoxIDs
PostgreSQL default endpoint / connection string: Host=localhost;Username=postgres;Password=xxxx;Database=FoxIDs
Add two websites
Enable ASP.NET Core hosting and add the two FoxIDs websites to IIS.
Add ASP.NET Core Module (ANCM) for IIS
- Install .NET Core Hosting Bundle installer (direct download) to add the ASP.NET Core Module (ANCM) for IIS, which is required to run ASP.NET Core applications, even throw the FoxIDs websites are self-contained.
- Restart IIS or the server
Add the FoxIDs website:
Site name
FoxIDsPhysical path e.g.
C:\inetpub\FoxIDsThe
httpdomain binding for your domain e.g.http://id.my-domain.comChange app service .NET CLR Version to
No Managed Code
And add the FoxIDs Control website:
- Site name
FoxIDs.Control - Physical path e.g.
C:\inetpub\FoxIDs.Control - The
httpdomain binding for your domain e.g.http://control.my-domain.com - Change app service .NET CLR Version to
No Managed Code
Optionally add the two domains to the servers'
hostsfileC:\Windows\System32\drivers\etc\hoststo enable local test on the server:127.0.0.1 id.my-domain.com 127.0.0.1 control.my-domain.com
HTTP and HTTPS
FoxIDs support both HTTP and HTTPS, but you should always use HTTPS in production.
You can skip this section if you wish to run FoxDs on HTTP without a certificate.
You can either use your own certificate(s) or have a certificate created by Let's encrypt.
Use your own certificate(s)
Install your own certificate(s) on the server and configure https bindings for the two websites.
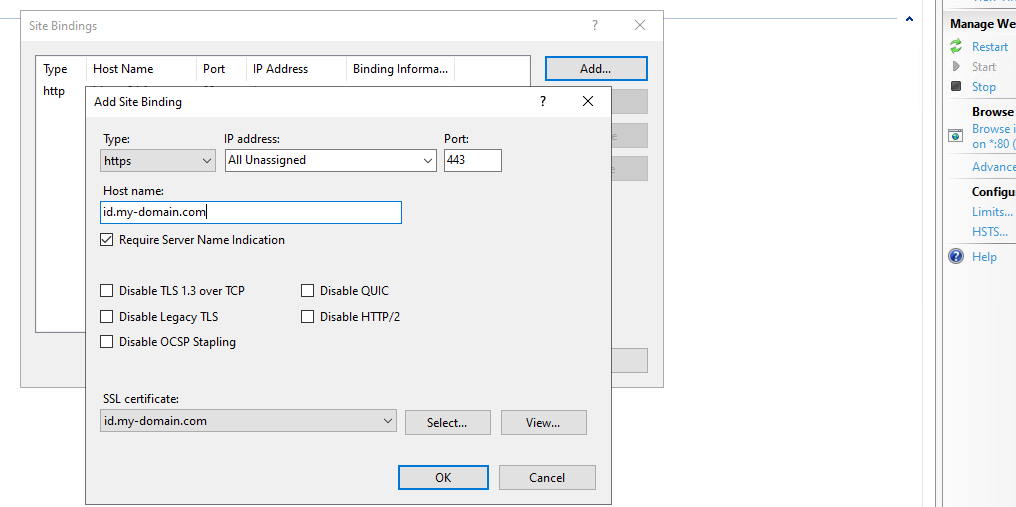
Certificate created by Let's encrypt
Create and add Let's encrypt certificate to the two websites with win-acme.
Download the win-acme.v2.x.x.x64.pluggable.zip file from the latest win-acme release.
- Unpack and place the
win-acme.v2.x.x.x.x64.pluggablefolder a permanent place e.g. on the C drive. The component is subsequently registered to run in Windows Task Scheduler. - Start an elevated Command Prompt in administrative mode
- Navigate to the
win-acme.v2.x.x.x.x64.pluggablefolder - Run
wacs.exe - Click
N - Select the websites
FoxIDsandFoxIDs.Control, probably by typing:2,3 - Click
A - Pick the
FoxIDssits as the main host - Agree with the terms (click
Nand then clickY) - Add your email
The two websites now have https bindings with the certificate created by Let's encrypt and the certificate will automatically be updated for every 3 months or so.
Xcopy deploy FoxIDs to websites
Download the FoxIDs-x.x.x-win-x64.zip file from the FoxIDs release and unpack the ZIP file. The zip file contains two folders one for the FoxIDs site and one for the FoxIDs Control site.
- Xcopy the zip file folder FoxIDs into the websites physical path e.g.
C:\inetpub\FoxIDs - And Xcopy the zip file folder FoxIDs.Control into the websites physical path e.g.
C:\inetpub\FoxIDs.Control
Configure both the FoxIDs site and the FoxIDs Control site in the appsettings.json files, located in e.g. C:\inetpub\FoxIDs\appsettings.json and C:\inetpub\FoxIDs.Control\appsettings.json
- Set the FoxIDs site domain in FoxIDsEndpoint e.g.
http://id.my-domain.comorhttps://id.my-domain.com - In FoxIDs Control site only. Set the FoxIDs Control site domain in FoxIDsControlEndpoint e.g.
http://control.my-domain.comorhttps://control.my-domain.com - If the domain starts with
http://..., remove the commenting out of"UseHttp": true, - Configure the database access, either to MongoDB
or to PostgreSql with your"Options": { "Log": "Stdout", "DataStorage": "MongoDb", "KeyStorage": "None", "Cache": "MongoDb", "DataCache": "None" }, "MongoDb": { "ConnectionString": "mongodb://localhost:27017" },postgresuser's password"Options": { "Log": "Stdout", "DataStorage": "PostgreSql", "KeyStorage": "None", "Cache": "PostgreSql", "DataCache": "None" }, "PostgreSql": { "ConnectionString": "Host=localhost;Username=postgres;Password=xxxxxxxx;Database=FoxIDs" }, - Optionally configure to send emails with SMTP.
Patching and update strategy
Updating FoxIDs follows the same mechanics as the Xcopy deployment, but a bit of extra structure keeps downtime low and provides an easy rollback path.
- Plan the window - Review the newest release notes, FoxIDs is backward compatible (unless otherwise specified in the release notes), and schedule a short maintenance window. If the two sites sit behind a load balancer, drain traffic from one node at a time.
- Stage the binaries - Download the newest
FoxIDs-x.x.x-win-x64.zip, unpack it to temporary folders such asC:\temp\FoxIDs.newandC:\temp\FoxIDs.Control.new, and copy over your existingappsettings*.jsonandweb*.config. - Snapshot the current install - Stop the two IIS sites (or their App Pools). Xcopy or rename the live folders, e.g.
C:\inetpub\FoxIDs→C:\inetpub\FoxIDs.2025-11-11.bak. Do the same for the Control site. A compressed backup or VM snapshot works as well, but quick folder copies are often sufficient. - Swap in the update - Xcopy the staged folders into the live paths (
C:\inetpub\FoxIDsandC:\inetpub\FoxIDs.Control) and double-check that inherited NTFS permissions still include the matching App Pool identities. Start the App Pools/sites again to warm up the applications. - Verify and monitor - Open the Control site, complete a login round-trip, run a quick tenant/track lookup and watch the log folder (
C:\inetpub\logs\LogFiles\foxids) for errors. If you use OpenSearch, check logs in and errors in OpenSearch. - Rollback if needed - If anything misbehaves, stop the sites, rename the freshly deployed folders to
.failed, restore the.bakfolders to their original names and start IIS again. Because the database schema is backward compatible, the previous binaries will pick up immediately.
Repeat the process for every release; on multi-server setups patch one server at a time to retain service availability.
FoxIDs log files
FoxIDs log files are default saved in the C:\inetpub\logs\LogFiles\foxids\ folder. You can change the path in the web.config file in the two websites.
Create the \foxids\ folder in C:\inetpub\logs\LogFiles\ and grant the two IIS App Pools iis apppool\foxids and iis apppool\foxids.control full access to the \foxids\ folder.
The logs contain errors, warnings, events and trace.
OpenSearch
Depending on the load, consider to use OpenSearch in production instead of log files.
Download OpenSearch or download from the download page.
- Create a folder on a permanent place e.g.
C:\opensearchon the C drive. OpenSearch is subsequently installed to run as a Windows Service. - Move the downloaded file
opensearch-x.x.x-windows-x64.zipto theC:\tempfolder (or another folder with a short name) and unpack the file - the file names are to log to unpack in the default download folder - Move the unpacked files to the
C:\opensearchfolder - Start an elevated Command Prompt in administrative mode
- Navigate to the
C:\opensearchfolder - Set an administrator password, run
set OPENSEARCH_INITIAL_ADMIN_PASSWORD=<custom-admin-password> - Start service, run
.\opensearch-windows-install.bat - Start another Command Prompt
- Test the OpenSearch, run test request
curl.exe -X GET https://localhost:9200 -u "admin:<custom-admin-password>" --insecure - Test the OpenSearch plugins, run test request
curl.exe -X GET https://localhost:9200/_cat/plugins?v -u "admin:<custom-admin-password>" --insecure - Go back to the OpenSearch Command Prompt and stop OpenSearch by clicking
ctrl+cand theny - The settings is found in
C:\opensearch\config\opensearch.yml, please review the settings. - Navigate to the
C:\opensearch\binfolder in the OpenSearch Command Prompt - Run
opensearch-service.bat installto install the OpenSearch Windows Service - Run
opensearch-service.bat managerto open the OpenSearch Windows Service settings - Set Startup type: to
Automaticand click OK - Run
opensearch-service.bat startto start the OpenSearch Windows Service
OpenSearch is default started with a self-signed certificate. You can configure a domain and a certificate, but in this guide, the self-signed certificate is retained and FoxIDs is configured to accept the certificate.
Configure OpenSearch in both the FoxIDs site and the FoxIDs Control site in the appsettings.json files, located in e.g. C:\inetpub\FoxIDs\appsettings.json and C:\inetpub\FoxIDs.Control\appsettings.json
"Options": {
    "Log": "OpenSearchAndStdoutErrors",
    //DB configuration...
},
"OpenSearch": {
    "Nodes": [ "https://admin:xxxxxxxx@localhost:9200" ],
    "LogLifetime": "Max180Days",
    "AllowInsecureCertificates": true //Accept self-signed certificate
},
Secure connection strings
In production, it is recommended to use connection strings with passwords for MongoDB, PostgreSQL and OpenSearch.
Do not store passwords in appsettings.json. Keep non-secret values in appsettings.json and configure secrets as environment variables in IIS for both the FoxIDs and FoxIDs Control sites. Environment variables override values in appsettings.json.
Configure these environment variables in IIS:
MongoDb__ConnectionStringPostgreSql__ConnectionStringOpenSearch__Nodes__0(first OpenSearch node including credentials)
Set only the variables you use.
Example values:
MongoDb__ConnectionString=mongodb://foxids:<password>@localhost:27017
PostgreSql__ConnectionString=Host=localhost;Username=postgres;Password=<password>;Database=FoxIDs
OpenSearch__Nodes__0=https://admin:<password>@localhost:9200
The values are stored in IIS configuration (applicationHost.config) outside the web root. Restrict access to IIS configuration files to administrators only.
To configure the variables in IIS:
- Open
IIS Manager. - Select the site (
FoxIDsorFoxIDs.Control). - Open
Configuration Editor. - Go to
system.webServer/aspNetCore. - Add values under
environmentVariables. - Repeat for the second site and restart both App Pools.
First login
Open your FoxIDs Control site (http://control.my-domain.com or https://control.my-domain.com) in a browser.
It should redirect to the FoxIDs site where you login with the default admin user admin@foxids.com and password FirstAccess! (you are required to change the password on first login).
You are then redirected back to the FoxIDs Control site in the master tenant. You can add more admin users in the master tenant.
Then click on the main tenant and authenticate once again with the same default admin user admin@foxids.com and password FirstAccess! (again, you are required to change the password).
The default admin user and password are the same for both the
mastertenant and themaintenant, but it is two different users.
You are now logged into the main tenant and can start to configure your applications and authentication methods.