Upload many users
Provisioning your users in an environment as internal users, with or without a password:
- You can upload the users with there password, if you know the users' passwords.
- Otherwise, you can upload the users without a password and the users are then requested to set a password with an email or SMS conformation code. Require the users to have either an email or phone number.
The users are bulk uploaded to an environment with up to 1,000 users per request when the users are created without passwords, and up to 100 users per request when passwords are included. This supports multiple uploads, allowing millions of users to be imported. You can either use the FoxIDs Control API directly or use the seed tool.
Example upload time for 50,000 users
| Scenario | Users | Batch size | Approx. total time |
|---|---|---|---|
| Without passwords | 50,000 | 1,000 | ~2 minutes |
| With passwords | 50,000 | 100 | ~2 hours |
| Password hashes pre-calculated on client | 50,000 | 1,000 | ~5 minutes |
Times are approximate and depend on client machine, network and infrastructure.
Uploading users with passwords takes longer because a password hash must be computed for each user, and this operation is intentionally time-consuming for security.
Upload time can be improved by calculating the password hashes on the client before uploading the users.
Upload with seed tool
The seed tool reads users from a CSV file and uploads the users to the configured environment. The seed tool also supports bulk user deletion.
By default, the seed tool pre-calculates password hashes on the client during upload to reduce server processing time.
CSV file
The CSV file elements are separated with ; and the text can optionally be in quotation marks.
You can find sample CSV files here: FoxIDs.SeedTool/user_upload_csv_files
(For example, see UTF-8 characters in claims in the file password-claims-3-test-users.csv demonstrating multi-language / extended character support.)
The first line of the CSV file is the case sensitive headers. You can select to use all headers or a subset of the headers and change the order of the headers.
The headers:
- Phone
- Username
- ConfirmAccount
- EmailVerified
- PhoneVerified
- Password
- PasswordHashAlgorithm
- PasswordHash
- PasswordHashSalt
- ChangePassword
- PasswordLastChanged
- SetPasswordEmail
- SetPasswordSms
- DisableAccount
- Claims
- RequireMultiFactor
The number of headers and elements in each line need to match.
This CSV file sample use the Email and SetPasswordEmail headers to upload users without passwords. The user is required to set a password with email conformation on the first login.
The email is thereafter marked as verified.
Email;SetPasswordEmail
u1@somedomain.test;true
u2@somedomain.test;true
u3@somedomain.test;true
This CSV file sample include a username and set the email and phone number as verified. The passwords are set with an email or SMS conformation code.
Email;Phone;Username;EmailVerified;PhoneVerified;SetPasswordEmail;SetPasswordSms
u1@somedomain.test;;u1;true;true;true;false
;+4422222222;u2;true;true;false;true
u3@somedomain.test;+4433333333;u3;true;true;true;false
This CSV file sample use all the headers and upload users with passwords and claims. The last user is uploaded as a disabled user.
Email;Phone;Username;ConfirmAccount;EmailVerified;PhoneVerified;Password;ChangePassword;SetPasswordEmail;SetPasswordSms;DisableAccount;Claims;RequireMultiFactor
u1@somedomain.test;+4411111111;u1;false;true;true;"My1Password!";false;false;false;false;"[{""Claim"": ""role"", ""Values"": [""admin""]}]";false
u2@somedomain.test;+4422222222;u2;false;true;true;"My2Password!";true;false;false;false;"[{""Claim"": ""role"", ""Values"": [""admin""]}, {""Claim"": ""customer_id"", ""Values"": [""1234""]}]";true
u3@somedomain.test;+4433333333;u3;false;true;true;"My3Password!";false;false;false;true;"[{""Claim"": ""role"", ""Values"": [""admin"", ""user""]}]";false
If you pre-calculate password hashes on the client, use the PasswordHashAlgorithm, PasswordHash and PasswordHashSalt columns and leave Password empty (or remove). You can optionally preserve the original password change timestamp with PasswordLastChanged (Unix seconds). When a password or hash is provided without PasswordLastChanged, the upload stamps the current time.
You should add passwords and claims with the ;""; notation. If a password contains the " symbol it is escaped, for example the password My"Password which become ;"My""Password";
Claims are added with a JSON structure without line breaks and the " symbols is escaped.
[
  { "Claim": "role", "Values": ["admin", "user"] },
  { "Claim": "customer_id", "Values": ["1234"] }
]
Download and configure the seed tool
First download the FoxIDs.SeedTool-x.x.x-win-x64.zip file for Windows or FoxIDs.SeedTool-x.x.x-linux-x64.zip file for Linux from the FoxIDs release and unpack the seed tool.
The seed tool is configured in the appsettings.json file.
Access to upload users is granted in your master environment.
Create a seed tool OAuth 2.0 client in the FoxIDs Control Client:
This will grant the seed tool full access to your tenant, for least privileges please see API access rights.
- Login to your tenant (in self-hosted the main tenant)
- Select the master environment (in the top centre environment selector)
- Select the Applications tab
- Click New Application
- Click Backend Application
- Select Show advanced
- Add a Name e.g.,
Seed tool - Change the Client ID to
foxids_seed - Click Register
- Remember the Authority.
- Remember the Client secret.
- Click Close
- Click on the application in the list to open it
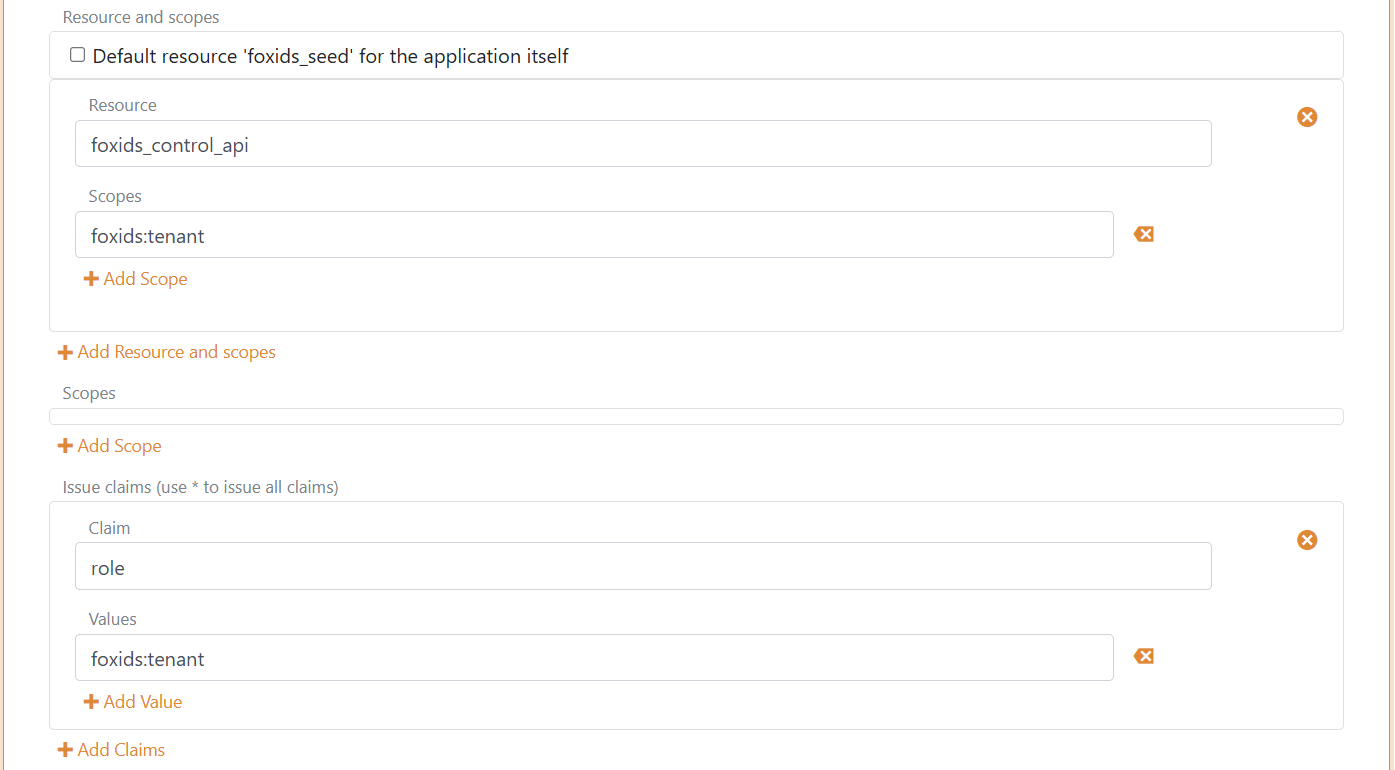
- In the Resource and scopes section
- Remove the check mark from Default resource 'foxids_seed' for the application itself
- Click Add Resource and scope and add the resource
foxids_control_api - Then click Add Scope and add the scope
foxids:tenant
- Select Show advanced
- In the Issue claims section
- Click Add Claim and add the claim
role - Then click Add Value and add the claim value
foxids:tenant
- Click Add Claim and add the claim
- Click Update

Add your FoxIDs Control API endpoint and tenant and environment and the seed tool Authority and Client secret and CSV file path to the seed tool configuration.
"SeedSettings": {
    "FoxIDsControlEndpoint": "https://control.foxids.com", // self-hosted "https://control.yyyyxxxx.com" or local development https://localhost:44331
    "Tenant": "xxxxxx",
    "Environment": "xxxxxx",
    "Authority": "https://id.foxids.com/zzzzz/master/foxids_seed/", // custom domain, self-hosted or local development "https://https://localhost:44331/zzzzz/master/foxids_seed/"
    "ClientId": "foxids_master_seed",
    "ClientSecret": "xxxxxx",
    "Scope": "foxids_control_api:foxids:tenant",
    "UsersSvcPath": "c:\\... xxx ...\\users.csv"
}
Run the seed tool and upload the users
- Start a Command Prompt
- Run the seed tool with
SeedTool.exe - Click
Uto start uploading users
The upload can take a while depending on the number of users.